Monday, November 30, 2009

Pattern Review: Amy Butler Nappy Bag


I had been eyeing the Amy Butler Nappy Bag pattern for a while, and finally decided to go for it. Her marketing is slick, and I was drawn in!

This sling bag is really big and has a lot of pockets. It also feels heavy when it is empty. I used a lot of different fabrics because it calls for a ton of material.

When I was making it, it was fun to make. The directions were straightforward and laid out nicely. I also like that the pattern comes on white paper instead of thin pattern paper. I made one side of the bag's interior in PUL so that I would have waterproof pockets for food and soiled clothing and I like this modification. I also added a few zippers, and like them. If I did it again, I would add them again, but I would do a tidier job of putting them in.

She has a bottle bags on both sides on the interior and has them designed to overlap half of each of the side pockets. I thought that was a waste of space, and raised the bottle pockets and turned them sideways on the inside. I added a snap to one and a zipper to the other.
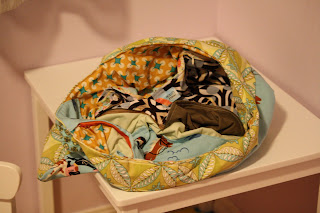
I like the bag, but would do it again by skipping the interfacing and skipping the bottle pockets. I would zipper 4 of the 6 interior pockets (my guy's little hands like to reach in and take stuff out and he hasn't mastered all zippers yet). I would use a bland solid color for the interior because hardly any of it ends up showing. I would use all hard cotton materials (my pocket exterior fabric was a stretch and I had problems with it bunching). I would also consider cutting the strap fabric separately and stitching it together to waste/ use less fabric.

I like the bag, but I don't love it. I love the size and how it falls on my shoulder, and the amount of interior pockets, but I think I need to re-make it with the changes, since I don't love how it looks.
UPDATE: I have now traveled with this bag and really like it. The size is great and the pockets are great. I am thinking it needs a snap-on cover so that it can be hung from a roller bag as we go through the airport and we don't need to worry about stuff falling out. I definitely want to re-make this in other fabric.
Posted by Picasa
Pin It

Tuesday, November 17, 2009

Vintage Pattern Review: Butterick 3505

Butterick's Vintage Pattern 3505 is for drop-flap footed toddler pajamas. When I found it online, I thought it might just be heaven. The idea that I could sleep our little guy warmly but still be able to get him to the bathroom in the middle of the night in a timely manner was very appealing.

The pattern arrived and I got going. I made a 2T, and it is HUGE on my 15-month old, who wears a 2T in a lot of clothes. Maybe sizing has changed over the years. I made it in flannel, thinking I had more flannel than fleece, and could make the fleece one later, after I got the kinks worked out of the pattern. I only had yard cuts of flannel, though, so I used two coordinating prints. I used another color for the soles of the feet. If I make this again, I will use a fabric called Jiffy Grip for the soles, which has gripping dots so help keep the little ones from slipping when they are walking. I used white 4-way stretch cotton for the wrists (the pattern called for rib knit, which I didn't have). It called for 4 buttons on each side of the drop-flap, and I used 2 snaps instead, thinking that would be enough work to take off and re-snap, and that eight would be a lot in the middle of the night.

It was pretty easy to put together. The directions were straightforward and clear. The pattern was marked nicely and the steps were logical. The only step I had trouble with was in measuring the ankle elastic. The directions said to measure the ankle and add on a specific amount for stretch and seams. BUT my issue was that by that point it was clear that this was going to fit at some future time, so I was going to have to estimate ankle circumference. I would have liked to have guidelines to go up and down from.

I am looking forward to using these pajamas. I don't think they are going to be my winter answer, though, since 4 snaps in the middle of the night is still a lot of snapping down then up while trying to disturb the little one's sleep as little as possible. I am considering using the idea but making them split-crotch instead of drop-flap. But then that brings me full-circle to what we use now: a long-sleeve shirt and fleece split-crotch pants.
Posted by Picasa
Pin It

Saturday, November 7, 2009

Scandi Mei Tai - Take 2 - Reversible Cowboy Mei Tai

The other Scandi Mei Tai I made in September 09 does not get that much use around our house because the hood simply isn't large enough. Another downfall is that I removed the pocket and haven't come up with a better solution for it yet. So I decided to give the Scandi Mei Tai Tutorial another try.
This time, I made it reversible. I upcycled an old pair of jeans as part of the project. I took the pockets off and used one on each side of the body of the carrier. I left the pockets intact in case I can figure out how to use them on the waistband (you can sort of see them in the top photo).


The hood on this one is a LOT larger-- I used the hood pattern for a 4T jacket from Kwik Sew 2911 and elongated it by another 3" at the bottom. The hood loops are longer than she recommends in the tutorial and I put them overhanging the inside edge of the straps. An improvement on this would be to find somewhere to store the hood when not in use so it doesn't block the pattern of the body of the carrier. It does seem to be big enough to afford us some privacy for sleeping or nursing.


I really like how this carrier looks. I also like how it feels. After testing it in the house, our little guy has pulled it out and brought it to me a number of times. Maybe that means he likes it, too!
Posted by Picasa
Pin It

Box Bag


I really enjoy following tutorials on the internet, and finding new ideas to try. When I found this box bag tutorial , I decided to give my new zipper prowess a try.

Well, the lovely bag you see pictured here took a really really long time to make!

The zipper is hidden between the lining and the outer material, and the instructions left me a bit confused on this, and I had to rip it out twice.

Another error I made was in making it really long. I misunderstood which side of the rectangle of fabric I needed to put the zipper on, so I ended up with a rectangle more than a box.

I also had to re-read the directions on how to make the ends a few times. I am happy with their box-ness, though.

I liked how the handle went into the bag, but had to re-stitch it twice as well. I had originally followed the tutorial and made it twice as wide as needed.

This LONG exercise taught me that I should make sure and read to the end of the instructions and make it in my head before deciding to do the project.
Posted by Picasa
Pin It

Thursday, November 5, 2009

Pattern Review: Kwik Sew 2911 Vest

Kwik Sew 2911: Toddler Vest and Jacket
The other pattern I saw for a toddler vest was Kwik Sew 2911. I am really happy with the pattern, and have made six already. I made the one in the top photo using the pattern almost exactly. It calls for swimsuit material and does the binding this way. The material I found was striped and it didn't end up lining up exactly, so some of my binding is two-toned, and I'm not sure how much I like that. The directions also didn't specify to pull it tight or not, and I was happier with it when I pulled it tight, but it was still a bit wide. I found the zipper instructions fine-- they got me through it but I had to re-read them a few times to figure out how to cope with the excess length on the top. I loved how they have you do the collar-- by sewing on the inside-- but have yet to perfect it (I keep having it land in a crooked line of what looks like topstitching from the front side). I modified the 1Ts and 2Ts of the pattern I made to take out the pockets.
I made two renditions of the vest with a hood (from the hooded jacket portion of the pattern). This is because my little guy seems to take off his hat all the time and will leave a hood on from time to time. I really like these. They solve the issue of the collar stitching not going straight, since there is no collar stitching here. I am back and forth on how much I like the aesthetic of a hooded vest versus a collared vest. It uses a lot more fabric, and is larger to carry in a diaper bag, but then it is possibly warmer. The red vest is made of a higher quality fleece, and feels really thick and toasty.
After the first vest, I started using FOE (fold over elastic) to bind the armholes and bottom. The only issue with this is trying to figure out how to have the binding and zipper meet.

In the bottom photo, the camouflage vest is a size 4T. I did my first pockets here. The directions have a lot of overstitching on the inside, and I didn't find it all that useful. My guess is that it would be more useful if you were using something other than fleece as the material. All three of these in the photo are gifts.

Overall, I really like this pattern. The pieces are easy to cut, there aren't too many of them, and it stitches up nicely. It fits well, almost like an oversized sweatshirt. The length is nice, as is the size of the armholes and the collar. I went down in zipper length from the recommended length, and like the how the 12" zipper lays more than the 14" zipper.
Posted by Picasa
Pin It

Pattern Review: McCall's 3416 Vest

With fall upon us, we needed a vest for the little guy. Instead of buying one at REI, I opted to find a pattern and make one. The first pattern I found was the McCall's 3416 in size XS/S. It is for a vest, shirt, and pants.
I cut out the vest pattern and realized the XS was WAY too big for us for this year. So I took it to the copy store and re-sized it to 75%.
With the fabric I chose, I decided to skip the pockets on the front. My 15-month old son doesn't use pockets yet, so I wasn't motivated to use the extra fabric required to make the pocket pattern match the underneath pattern.
I think it is an ok pattern. It has interfacing on the armholes and inside the zipper, and uses quite a bit of hand stitching (on the inside of the collar and around the armhole interfacing). The directions to stitch the inside of the collar were a bit confusing when I got to the part about attaching the front facing and the collar. But it was my first zipper ever and I found the directions quite easy to follow to put it in.
The fit is just ok as well. I am not sure if this is because I re-sized the pattern, or if that is how it is meant to be. In re-sizing, I kept the seam allowance as stated, so perhaps this complicated things. My complaints about the size are that it is a bit too short and that the arm holes are too wide. I like that it is trim through the torso.
Overall, I really like this piece and am disappointed that my little one has almost grown out of it and it's only been a few weeks. I will most likely not try the pattern again as he gets older, since I think the Kwik Sew one I found is a lot better (see next post). The advantage of this one is that the fit is more trim through the body and fits more like a shirt than an oversized jacket.

Posted by Picasa
Pin It

LinkWithin

Related Posts Plugin for WordPress, Blogger...