I am amazed this project is finished. It took almost a whole week of sewing time~ but I am happy with the result.
The bag is called the Insulated Lunch Bag with Drink Pouch and it is from the Design Collective's book called "Lunch Bags!"
I think it took so long to sew, in part, because the directions were a little convoluted. They were laid out as a cutting list by material instead of by bag part, so I did a lot of measuring then going back with another kind of fabric and measuring again. It also required some quilting, which takes a while.
The only part I didn't do right was the casing for the drink pouch. I did the buttonholes in the center of the casing piece instead of the center of half of it-- so mine isn't centered once the piece is folded in half. I think I am used to internet turorials, so understanding the directions in a book, with fewer photos and a more formal language, takes a little getting used to.
I did like her use of bias tape, though, and it was quite clear how to make and use it. I also really like her closure of the bag, with two loops. I hope it keeps it shut!
I also adjusted the lining a bit. I added a zipper pocket for money or keys (in case this ends up as the only bag instead of as an additional lunch bag). I used the directions on jcaroline creative's hobo bag for this pocket. I also added a cutlery loop, so I can find my spoon easily.
I am looking forward to using this bag. It seems like a good size and like it has some useful features (insulated, handle, closes, zipper pocket and cutlery loop).
Pin It
Saturday, January 22, 2011
Friday, January 21, 2011
Sewing with PUL doesn't have to be frustrating
This is a really fabulous fabric. It is waterproof and light, and you can wash it and dry it like any other materials. I avoid bleaching it and the lifespan is a little longer. It comes in an array of colors and patterns, and it totally breathable.
It can, though, be frustrating to sew.
But I just figured out how to avoid that!
Sew with the PUL side up! Not down!!! (When you are sewing PUL and another material together). That way, it doesn't get stuck in the feeder and the top and bottom materials will stay even while stitching.
Ahhh.... Pin It
Labels:
Sewing Tips
Friday, January 14, 2011
Easy Up and Down Pants with Pockets
My son LOVES pockets. Mommy and Daddy like to put their hands in their pockets, so he is currently only wearing clothing with pockets.
I made these for him yesterday, and think they are a good first pass at hidden side pockets.
I used my favorite pants pattern (Easy Up and Down Pants) in natural colored hemp fleece. I used a band of white lycra for the waist instead of a band of the pants' material with elastic inside. I cut it to 15 1/4" because I have an underwear pattern (from That Darn Kat on Etsy) that says that is the length for 4T and it seems to work for him.
I used half of a precut flannel wipe square from Wazoodle (8" by 8" with rounded edges) for the pockets, eyeballing his hand size (no need to wake the poor fella').
To make the pockets, I first cut the square in half, then half again (to make 4 pockets). I took each of the smallest pieces and stitched around three sides. When it was time to sew the side seams of the pants, I placed them two inches from the top, and stitched the first 2". Then I stitched each side of the pockets separately, making sure what would be shown from the front was a nice seam and all raw edges stayed inside. Then I stitched down the rest of the leg. I have been double-stitching pants lately, finishing the edges with a zig zag (you could also use a serger). When finishing these side seams, I went down the 2", then around the pockets, then down the leg.
He seems to like them, although the pressure from his hands was taking the pants down a little at the waist and we had to tug them up a few times.
I also made two other pairs of pants with pockets. The one on the left is sweatshirt fleece and the other is cotton. The white one has pockets on both upper thighs and a pocket on each side of the rear. I finished the pockets and hem with a zig zag (and no turning), creating a bit of a lettuce edge. These were the pants he insisted on wearing this morning, although he got a, "she is so cute!" this morning (we paired it with a Patriots sweatshirt and Raiders hat-- not the most feminine, I thought).
The last pair was set to be his favorite (guess who chose the material). Hard cotton makes the pattern sit a little tighter across his legs, which is ok because he doesn't fill them out, but the pockets were too low! They have been sent back to mommy's office for re-working.
Pin It
I made these for him yesterday, and think they are a good first pass at hidden side pockets.
I used my favorite pants pattern (Easy Up and Down Pants) in natural colored hemp fleece. I used a band of white lycra for the waist instead of a band of the pants' material with elastic inside. I cut it to 15 1/4" because I have an underwear pattern (from That Darn Kat on Etsy) that says that is the length for 4T and it seems to work for him.
I used half of a precut flannel wipe square from Wazoodle (8" by 8" with rounded edges) for the pockets, eyeballing his hand size (no need to wake the poor fella').
To make the pockets, I first cut the square in half, then half again (to make 4 pockets). I took each of the smallest pieces and stitched around three sides. When it was time to sew the side seams of the pants, I placed them two inches from the top, and stitched the first 2". Then I stitched each side of the pockets separately, making sure what would be shown from the front was a nice seam and all raw edges stayed inside. Then I stitched down the rest of the leg. I have been double-stitching pants lately, finishing the edges with a zig zag (you could also use a serger). When finishing these side seams, I went down the 2", then around the pockets, then down the leg.
Just like Daddy! |
He seems to like them, although the pressure from his hands was taking the pants down a little at the waist and we had to tug them up a few times.
I also made two other pairs of pants with pockets. The one on the left is sweatshirt fleece and the other is cotton. The white one has pockets on both upper thighs and a pocket on each side of the rear. I finished the pockets and hem with a zig zag (and no turning), creating a bit of a lettuce edge. These were the pants he insisted on wearing this morning, although he got a, "she is so cute!" this morning (we paired it with a Patriots sweatshirt and Raiders hat-- not the most feminine, I thought).
The last pair was set to be his favorite (guess who chose the material). Hard cotton makes the pattern sit a little tighter across his legs, which is ok because he doesn't fill them out, but the pockets were too low! They have been sent back to mommy's office for re-working.
Labels:
EC,
Pattern Review,
Sewing Ideas
Wednesday, January 12, 2011
Wild(er) Re-usable Nursing Pads
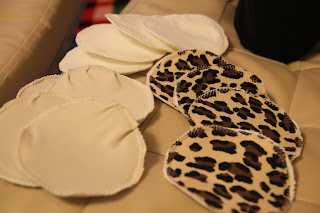
So if the goal is to absorb leaking milk and not be seen from the outside, then a nursing pad needs to be tan or white on the outside, and thin enough to not be seen as a circle.
These all show white to the outside (PUL), and have a layer of Zorb inside. They are stitched with a zig-zag (a serger would also work) instead of turned and topstitched in order to keep the seams thin.
Another plus is if the pads don't stick when wet, so I used white suedecloth, tan diapermaker, and leopard suedecloth. I stitched with all white to keep the outside color the same. But~ I tried to make it a little more interesting on the inside.
I used Kayla's Cloth Kits Nursing Pad pattern again and it worked better for the suedecloth than the diapermaker from Wazoodle. The diapermaker slid around a bit and the suedecloth was more stable.
All in all, I think these will do the trick nicely.
Pin It
Labels:
Maternity,
Sewing Ideas
Absorbent Roll-up Portable Changing Pads
These are basically small (20" x 12") quilted piddle pads with a tie at one end. One is flannel and quilter's (aka "hard" cotton) and the other is hard cotton on both sides. The inside is two layers of Zorb sandwiching a layer of flannel (the flannel helps the Zorb keep the moisture in once it has absorbed).
To make them, I quilted the pieces together. Then I trimmed the edges. Then I added binding, which in this case was ribbon. The tie was last. On the brown one, I used an old tie from some pants (slightly elastic) and tucked it under the binding. On the purple one, I used two ties I had made for a mei tei hood I had taken off (basically 2" long and folded in half then half and sewn up and down both sides and knotted). I like how the ties work better than the loop.
Pin It
Labels:
Baby,
mats,
Sewing Ideas
Gift Set: Nursing Cover, Diaper Case, Burp Cloths
I have two baby showers this month and one lucky mom gets this cool set I made with the help of blogger: "Diary of a Quilter." My son also helped choose the material (Michael Miller Mod Blossoms and Moda Wee Woodland) and iron it (with much enthusiasm).
I bought a 14" piece of boning and 2 D-rings ages ago, meaning to make a nursing cover but not ever having an opportunity. I like that they are like aprons or scarves, but you have the boning so baby can see mom while nursing.
I used this tutorial, although there are a TON of them online. I modified it slightly, though.
I added a pocket on the bottom corner (for a cell phone or burp cloth or nursing pad). I did this by taking two 8" x 5" pieces of material, sewing them right sides facing and leaving a hole for turning. I turned them, then stitched across the narrower side as the top. I tried to match the pattern, then stitched it along the sides and bottom, closing the turning hole as I passed it.
Another modification was to put the boning in while I stitched the top, instead of threading it through after as she suggests. I did this because I dislike threading anything because it always takes me forever and I usually end up ripping and re-stitching something.
The second item is a dipes case. She calls it a diaper clutch, and has a good tutorial. I used a snap instead of velcro, but only because I have snaps and no velcro.
I also made two matching burp cloths. They are cute, and one can never ever ever have too many of these.
Pin It
Labels:
Sewing Ideas
Saturday, January 1, 2011
Kids' Scarf Tutorial
Ok, so maybe calling this a "tutorial" is going too far. But I made the little guy this fleece scarf in under 5 minutes, and you should be able to as well (those are my gloves in the photo).
Here's how:
1. Choose fleece
2. Cut fleece long enough to go around child's neck with enough extra for both sides to hang 2/3 of the way down chest (this will account for knotting). In my 2 1/2 year old's case, I made it about 2 feet long and 6 inches wide
3. If you really must sew (as my son insisted, since we were making something, after all), you may attach a label of some sort
4. All done!
This worked great for us in the snow and cold! It helped keep his parka from rubbing against his chin, and added warmth to his face and neck.
Pin It
Labels:
Sewing Ideas,
Tutorial
Subscribe to:
Posts (Atom)