Saturday, June 26, 2010

Phoebe Bag

I made the Phoebe Bag, thinking the shape would make a nice handbag that could also carry enough for my outings. I like it, but it is not big enough to close (for my purposes). I think that had I skipped the flap with the snap, it would be a better fit... but then, a lot of the style of it would also be gone.

The strap is an okay length- it could be an inch or two longer, but it is fine. I like how the lining fabric also lines the inside of the strap.

I modified the pockets, doing the zipper pocket from jcaroline creative's Hobo Bag on one side, and a long patch pocket on the other side, measuring space for my cell phone and a pen and using two lines of stitching to make three pockets within the patch pocket (one for the phone, one for a pen, and one for something else). I really like my new modified interior pockets for any bag, and will continue to add them to my future bags (I did the same arrangement with my modified Folklore Bag).

One odd item about the pattern is that she has you leave a hold for turning in the bottom of the lining. This means that the line of stitching to close it up is visible, instead of being part of topstitching around the top, like many other bags use.

This is a nice enough bag. It is not what I am looking for, but someone else will make good use of it.
Posted by Picasa
Pin It

Friday, June 25, 2010

Quilted Nonwaterproof Piddle Pads

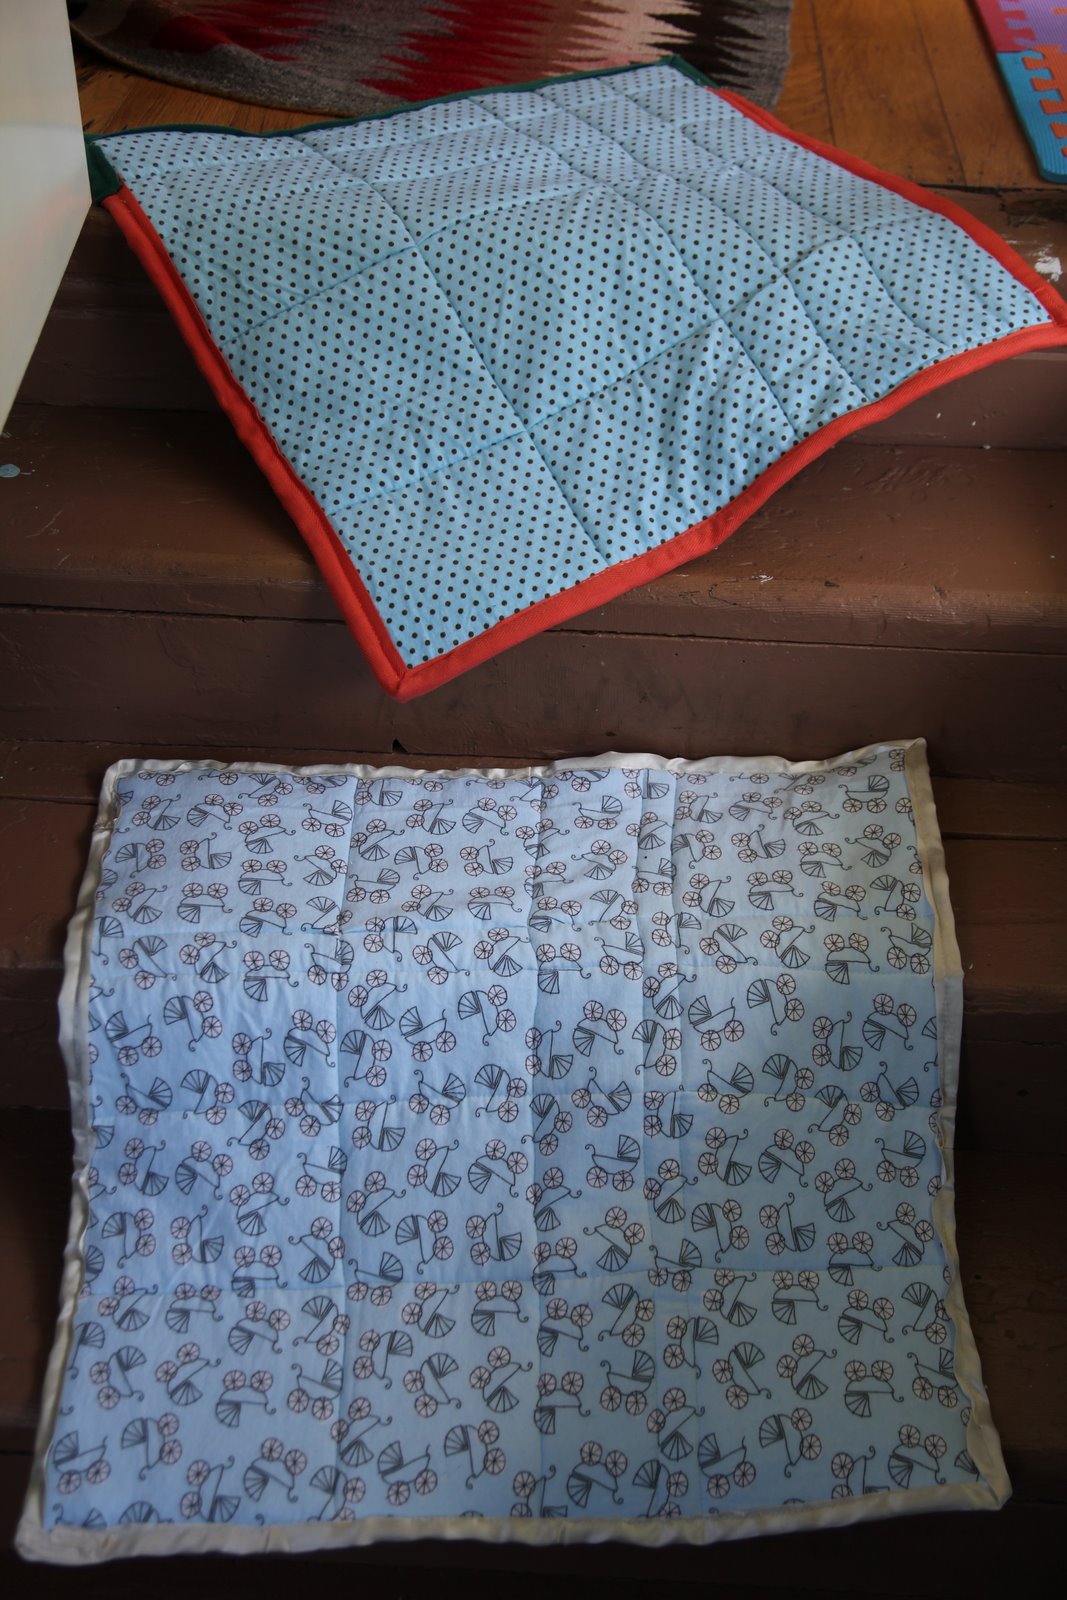
We like to use the nonwaterproof piddle pads these days as sleeping mats. At 22 months, our little guy is mostly miss-free at night (regarding EC- the potty training method we have been doing with him since he was very small). On the occassion of a potty "miss," it is nice to have these around to soak it up.

They are made of flannel on both sides, so they absorb and he will feel the wetness (it helps him realize he has gone, rather than wicking the moisture away-- but this is only if it is changed out quickly for a dry mat and he doesn't get used to being in wetness-- or at least that is the theory). There are two layers of Zorb inside, which is a super-absorbant material from Wazoodle fabrics. There is a layer of flannel sandwiched between the Zorb to help the Zorb retain moisture.

These two pads were my quilting experiment. I tried to make a simple pattern for the front using recurring squares. I added a bit of the reverse fabric on the front of each for symmetry. To quilt them, I "stitched in the ditch," or used my walking foot to make seams that followed the lines I had already made while creating the top piece. To bind it, I used some ribbon I had from a friend's wedding bouquets on one, and pieces of old boxing handwraps for the other. Both binding choices did not need to be hemmed, so it allowed me to just fold it over the edges and edgestitch, making sure to catch the back as I stitched the front. I tried to miter the corners as I passed them. When I got back to the beginning, I stopped and cut the binding material off. Then I stitched it to the beginning to make a citcle of fabric. Then I went back to where I was and kept edgestitching. This allowed the ends to be hidden.

Here is the back view:
Here is the front view:


I am really happy with these. They lay flat, and absorb nicely. Zorb is great because it absorbs a lot, and quickly, and it also washes and dries easily. The edges don't act as uncomfortable ridges, as some piddle pad edges are wont to do. The next time I do these, I think I will try a pattern of some sort with the quilting.
Posted by Picasa
Pin It

Edited Folklore Bag from One Yard Wonders

This is the Folklore Bag from Yaker Haskins' One Yard Wonders (again).

This time, the straps are interfaced and longer, and the lining is interfaced for added stability. The interior has two sets of pockets: on one side, it is an interior zipper pocket like jcaroline creative shows how to do with her Hobo Bag. The other interior pocket is a patch pocket made longer, and with two lines of stitching to separate it into three sections. One section is the width of my phone, the other is for a pen, and the other could be used for something else.
Posted by Picasa
Pin It

Saturday, June 19, 2010

Reusable Granny Cart Bag "Tutorial"

I like to use my granny cart to go grocery shopping. We take turns rolling the cart to the store, put it in the grocery cart while shopping, then load it up at the checkout counter. The baby gets a ride on my back on the way home, and we roll the groceries behind us. The problem sometimes is that one bag crushes the other, and we often stuff items next to the bags on the inside-- and these things sometimes fall through the cracks onto the sidewalk. Not pretty (or efficient). Another issue is that when I tilt it to roll it home, stuff can fall out when it is really full. Again this slightly defeats the purpose of grocery shopping.


I thought I could improve on the process by making a bag to go on the inside, with a top and a place for my credit card, cell phone, and key.

The first step was to take measurements and add for the seam allowance. I ended up cutting (out of Bird Talk fabric):
1. Sides: 4 pieces of 15" x 19 1/2" from the outer and from the lining fabric
2. Bottom: one piece of 15" x 14" from the outer and from the lining fabric
3. Top: one piece of 15" x 18" from the outer and from the lining fabric
4. Straps: 5 pieces of 4" x 10" fabric
5. Tabs: 2 pieces of 4" x 3" rounded from the outer, inner, and interfacing
6. Interior Pocket Bottom: 2 pieces of 4" x 5" of coordinating fabric
7. Interior Pocket Flap: 2 pieces of 4" x 2 1/2" of coordinating fabric

Then I took my iron and ironed the straps in half, opened them, then folded them in half again, bringing the fold inside. I stitched up and down the edges to make them look finished.

I ironed the interfacing to the outer piece of the tabs, and put half of a snap inside before stitching them, right sides together. I clipped the corners and turned them right-side out, leaving the bottom open. I topstitched around the closed sides.


Then I made the bag itself. I make the outer and inner bags identically, by stitching all of the side pieces together, then attaching the bottom piece.

To make the interior pocket bottom, I stitched both the bottom pieces together, leaving an opening for turning. I clipped the corners and turned the pocket. I hand pressed it open (an iron would have been better here). I topstitched on the short side and added half of the snap to the top center. I added my label, then stitched around the other 3 sides, closing the turning hole as I passed it. You could make this any size you want-- I just chose this size by holding my phone, credit card, and keys to the fabric and choosing the size based on these items that I carry to the store.

To make the interior pocket flap, I stitched both the flap pieces together, leaving an opening for turning. I clipped the corners and turned the pocket. I hand pressed it open (an iron would have been better here). I topstitched on the 3 of the sides, closing the turning hole as I passed it. I added the other side of the snap to the center, and snapped it to the bottom piece. I should have added the piece before putting the sides together; this would have hidden the cap of the snap. I pinned the top into place based on making sure the snapped pocket would lie flat, and stitched the top of the flap to the material.

Then I attached the pocket into the lining. I attached it on the front side, but probaby should have done it to the back, since it rolls at an angle. When it is full, I can't reach the pocket and it is apt to empty its contents into the groceries. It also could have been good on the top. I am undecided as to the best place for this pocket, but I like having it.

To make the top, I stitched the pieces on three sides, fronts together. I had pinned the tabs on one side, making sure the outer color would be outside when it was turned, and making sure not to stitch over the tabs. I turned the top and topstitched on the three sides.

Next, I placed the bags into the cart. I pinned the straps onto the bag, one in the back, one on each handle, and two in front. I also pinned the tabs in place. I marked where the snaps would go, and added them to the outer piece. The straps on the handles snap to themselves, and the others all snap to the bag itself.

The last step was to topstitch around the whole bag, turning the top edge underneath to hide the edges. The straps and top were attached with this step. I added another label to the front.


After using it, I am happy with it overall. I can get more groceries (I brought home 3 watermelons this week, plus our regular fruit, veggies, and bread). All of the nooks and crannies can be filled up with food. A downside of this is that it can get HEAVY-- I rolled over my foot on a curb this week and dropped some grapes overboard. I LOVE the top flap, though. I would consider having it close the other way, though, since the cart rolls at an angle and it would halp keep everything in. The top is measured to extend over the top by a few inches, though, and this helped keep everything inside nicely. Pin It

Monday, June 14, 2010

Hot Mitt and Potholders from One Yard Wonders

This project did not turn out to meet my expectations. But instead of an overall disappointment, I got a lesson in quilting. I also now have a hot mitt and potholders to give away.

This project is from the book "One Yard Wonders" by Yaker Haskins. She is very clever about using an entire yard with her projects: no more, no less. This means that you need to be careful cutting, which I wasn't when making this. I was very careful to iron all of my pieces, heeding her advice (I think it was from her. Darn that Mommy Brain!!) that ironing makes things look handcrafted instead of handmade. I like that distinction, and, when I read that, vowed to be more careful. Unfortunately, this didn't come to mind as I was practicing ripping the fabric instead of carefully cutting it, and some of the bias material ended up different widths. I think it is unnoticable in the final product, but it did make these a bit more challenging.


I think these were a great lesson in quilting, which I have been meaning to try. They are small, and I got to put on my walking foot and try it out. My takeaway from this brief foray into quilting is that I need to get the right supplies before trying again. My lines were crooked and my rulers, cutting mat, and tailor's chalk were of no help. I will need to purchase a quilter's ruler, quilter's chalk, and a quilter's guide to attach to my walking foot if I am going to attempt to make visible straight lines atop fabric again. The walking foot was great, though. I have had problems in the past (while making piddle pads) with the fabric bunching up when tacking thick pieces of fabric together, and this walking foot made any issues like this disappear.  Interestingly enough, I didn't really have these issues when using flannel on both sides.

Another mini-quilting lesson was in binding. I got to try eight corners with this project, and stop and hide "bias tape" three times. I also learned why bias tape is usually cut on the bias (duh): it wrinkles and doesn't lay flat when it is cut straight, as it is with this project when you use only a yard for the project. You end up making double-fold bias tape, and sewing one edge in, and folding the rest under. Mine didn't end up laying flat, and I think it would have been easier with less folding back and forth. I am thinking this is the difference between single-fold and double-fold bias tape and can keep this in mind in future projects and let you know as I learn the difference. Also, about those eight corners-- her directions had you stop and cut the thread, then fold it at 45 degrees, then start again. I tried this with one and it didn't really work. So I ended up semi-mitering the corners by folding them under on the top and bottom as I got to them. I will need to research corners before binding a quilt. Lastly, I liked how she had you fold under the starting edge 1/2", then tuck the end part underneath once you are back to the starting point again. It does a nice job hiding the edges of the material.

All in all, this has satisfied my desire to start quilting and I will go back to baby/ toddler clothes and bags. Okay, and maybe some other assorted items. However, it did not satisfy my desire for new hot pads, since these are way too thin. I bought Insul-Bright  and it is too thin. The shape of the mitt is okay, but the potholders are too big (and too thin).

I am not dissuaded from trying more of her projects, though. This was fun to make.
Posted by Picasa

Here is the book.
Pin It

Make it Monday Reversible Headbands Disaster

I saw this tutorial for reversible headbands and thought this would be a great quick project and would use up some scraps.

I also thought it would help use some of my new favorite item: woven fusible interfacing.

Lo and Behold, things are not always what they seem.

The project uses a really long scrap, so it is not much of a scrap at all.  I had to cut into my stash to get long enough pieces.

 It makes a really WIDE headband that is much too wide for my head. On the second one, I tried using a wider seam allowance to make it thinner and this was stilll too wide.

It also uses an odd way of turning the whole thing, which I changed and did another way. Instead of her way, I left an opening on one side as wide as the elastic to tuck it into. I then stitched around as usual and left an opening for turning on one side, and hid it while topstitching, which I think looks cleaner than her zigzag method.

One thing I liked about this project was her advice to change the bobbin color to match the backside fabric. I had to re-read it a few times for that to make sense, though.

All in all, I'd give this one a skip.
Posted by Picasa
Pin It

Tuesday, June 1, 2010

Why I Love Bikram Yoga

The room is heated to 105 degrees and a humidifier brings it to 40% humidity.  The mirrored room holds between 10 and 35 students (where I go), so you get between three and six feet of personal space for your mat. The teacher never wavers from "the dialogue" that they learned from Mr. Bikram and rarely cracks a smile.  All of your personal belongings are in the back room except for a towel, mat, and water bottle.  Nobody talks to each other, except in the locker room, and nobody modifies any of the poses.  You sweat, grunt, and make your way through the same 26 postures every single class.  Sweat drips all around, and the floor is carpeted!!  The teacher knows everyone's names and is constantly mentioning who is doing it right and who can improve and how.

Despite- or is is because of- all of this, I love Bikram Yoga.  Since I have been going, my back has stopped hurting 95% of the time (I was diagnosed with a slipped disc at L5/S1 recently), my shoulder and elbow never click any more, and I have more time in my day for the mundane (such as doing the dishes).  My knees are much more mobile and in less pain (I have torn both ACLs and one MCL), and I can sit on my heels for the first time since I was a child.  I can also garden with abandon, and carry my child whenever he needs (which is actually a lot-- around an hour or two per day still).

When I first started going earlier this year, I thought it was great and unlike any Yoga I had done previously.  In Bikram's book, he explains that this method is the "real yoga" and actually makes a pretty good argument for this.  The book is inspirational, and explains that if you do his yoga for 60 days straight, except Sundays, that your whole body will fast-track to a much better state.  Then he says you can lay off to two to four days per week (or more if you want to get more of the benefits) and still retain all of the wellness that you have accumulated.

His book also explains that these 26 postures help the entire body, inside and out, as well as the mind and spirit.  It sounds too good to be true, but I think he is onto something.

I go to a local studio near me called El Cerrito Yoga.  There is another Berkeley studio called Funky Door Yoga that a girlfriend of mine attends and to which I have never been.  There are studios all over the area and all over the world.  All of the instructors are taught by Bikram himself, and he has them all say the same dialogue throughout the class.  Again, despite (perhaps because of) this repetition and familiarity, I feel myself improving at each posture, slowly and surely.  Each time the instructor says their shtick, I hear whatever I need that day and can improve on whatever my body is up to at that moment.

The next time I get pregnant, I am going to continue doing regular Bikram for the first trimester.  Then his wife has created a set of poses you do during the regular class, which are shown on her DVD (which you can also buy cheaper if you buy it directly from Bikram).  I loved doing yoga during my first pregnancy, and my practice is so different now, with Bikram Yoga, and I am looking forward to continuing it when the time comes. Pin It

Saturday, May 22, 2010

Chuppah Collaboration - Bamboo and Silk

I was honored to be asked to make the cloth portion of the chuppah for the upcoming wedding I have been sewing my little guy all these fancy clothes for.

The groom made all of the wooden parts. He took 4 bamboo poles and staked them into the ground using Tiki Torch stakes.  He wrapped the top of each with twine like this and had it taper a bit.  He cut the front top and back top poles to six feet long and the side top poles to 54" long.  Onto the ends of all 4 of these poles he screwed in metal rings that were 1 1/2"  in diameter (I couldn't find anything similar in a quick Google search).  He placed the side poles atop the ones in the ground, then put the front and back atop those.

They had debated whether or not to have the chuppah be free-standing or to have the holders actually hold it, and the stakes will allow them to do either, although I think they are going to keep it in the ground.  If this is the case, then they will take the stickers off the stakes, or wrap them in some of the leftover silk.  On the big day, they are also going to adorn the poles with lemon leaves like this wreath uses.

To make the chuppah cover, I made a sleeve for the pole to go into that was wide enough for the ring to pass through.  They wanted a foot of material overhanging, so I measured 15 1/2" inches from the edge, then folded it over and marked it at 12 1/2" inches and made the seam there. I counted across six feet for the body of it, then added 15 1/2" inches, and made a cut.  This cut was actually the hardest part of the chuppah, since the silk is pretty delicate and there wasn't any pattern to follow (on the material).  I was afraid to rip it, like I cut most of my material, but was later told that would have been okay.  Next time I use silk I will try it...  Then I did the same measurements and seam on that side and hemmed both sides (pressing a hem first and tucking the excess fabric inside).

The width happened to be just wider than their chuppah (either luck on my part or good planning on their part), so I was able to keep the edges as the selvages.

The next step of the project was to make 4 little bags, one for each corner.  The couple sent everyone a card to return with their RSVP and asked them to write on it a wish for the couple and their future together.  These cards were to go into the bags.  So to make the bags, I cut across the width of the silk a piece 11" tall.  I cut it into 4 pieces, and pressed a hem into what would become the short side of the bag (a la my re-usable produce bags).  I stitched on two sides, then made the hem on the top.  To attach them to the chuppah, I made a strap for each by cutting a 4" strip of silk.  I then pressed it in half, and pressed it closed.  I stitched up and down this strip.  I cut this into 4 pieces, so each turned out to be about a foot long, or just under.  I took four rings like these and folded each strap in half around a ring, then stitched it to the hem on the side with a seam (remember these bags were made with only 2 seams; this way, the seam side stays up and the fabric side would be down towards the audience).  To attach the bags to the structure, we just put them on top of the rings holding the sides up.


When we did a trial run of the chuppah put together, it was quite windy. This made me go back and add fabric rings to each end of both silk sleeves so they could be looped around with the metal hooks onto the poles.  These were made the same way the bag straps were constructed, and were about 5" long.

Another adjustment after the trial was that the poles were originally  made shorter in the back (see top photo).  This was to make the cloth more visible and create a cozier "house" feeling (I think- I actually didn't ask but that was the impression I got).   With the wind, it seemed like it would make the "house" too short, so we experimented with raising the back poles to the same height as the front (see bottom photo).

T-minus 8 days...

Posted by Picasa
Pin It

Friday, May 21, 2010

Favorite Toddler Books

My son is almost 21 months old.  His tastes in books have been changing, and here are some of the current favorites...


This book actually tells a story, which a lot of the beginner books lack.  It also has animals-- so you can do fun noises.  I often read this one with my own story to their theme, but, hey, I'm the one talking here.  And it's more fun for me that way.

Yes, I know, it is the old classic.  But it is a classic for a reason.  The objects in it are becoming more interesting and our little guy likes to interact and tell the story with us.


I think this is the one we have... except ours is also in Spanish.  But it is a good book because it has a zillion animals in it, and our guy can read it on his own.  Then he can point to animals and we can tell him the names.  Plus I get to brush up on my Spanish.  It is endlessly entertaining.

We LOVE this book.  All of the noises are great, plus there is a page with the moon and howling, which has been great as he is starting to talk.  It is also good for learning numbers.


These are a little young for us now, but have been great.  It is fun to lift flaps to interact and then discuss the objects and people.

He is really into opposites right now.  We don't have this one, but she is fabulous and he loves "up" and "down" and "in" and "out" in other books.  One that we read often is called "Big and Little" and I can't seem to find it on Amazon to link it.  It has a bear and a mouse on the front cover.

This is one of our favorites, too.  It rhymes nicely, and mirrors our own bedtime routine.  The problem with it is that you don't want to interrupt the rhyme to talk about it, but it is fun anyway.

It is fun to moo and baa along with this one.  This also uses real photos, which is a lot more helpful than illustrations.


This is another favorite of ours.  The story repeats the same language, which is helpful.  It is also nice to see the animals in different positions than just facing you.  Other than that, I don't know why he loves this book.  He just does.

This book has holes in it to stick your finger in.  It also has strawberries, which we have growing in the garden, and we also get at the store very often-- so it's a good standby.


We have just started to get into sticker books (we did it around 19+ months).  There is the whole debate about whether to un-stick the errant sticker and re-stick it where it belongs, so I am not sure about it.  We do use it, and he does like it a lot, though...


I made a family photo book using one of the online services where you upload photos and they turn it into a board book for you.  I can't remember the name, which is okay since the book is falling apart from over-use, so I won't recommend the company.  I think laminated family photos would also do the trick.  He is really into names and people right now.


This is a good book because the duckies are 3D and one squeaks.  It is a little long-winded but who needs to say all the words, anyway?


Do you have any favorite toddler books to share???


Pin It

Wednesday, May 19, 2010

The Folklore Bag from "One-Yard Wonders"

This is the Folklore Bag from the book: "One-Yard Wonders" by Yaker Hoskins with some interior pocket modifications.

I really like the size of the bag and I think it is clever how she uses a yard of material to make it taller by blocking across the top. Her directions were easy to follow and really clear. The pattern was made from pieces included in the book, which come on huge sheets of pattern paper. I traced these onto white paper, and liked this better than cutting the massive pages.

She uses interfacing on the bag, and I would have liked for her to use it on the straps as well as the body of the bag. When I make this again, I will also add another layer of interior fabric to the block across the body of the bag to give it more substance.

Her pattern calls for the interior pocket to be a small one on one side. I modified this to make it larger and snap to the lining. I added another zipper pocket on the other side of the bag. When I make this again, I will make a larger zipper pocket and do the other side the same (with a larger pocket with a snap).

Overall, I like this bag. I like that it is two straps instead of one, and the size and weight of the bag ~ except that the straps are too flimsy.
Posted by Picasa
Here is the book if you are so inclined.  It had a lot of good ideas, and I have bookmarked about 5 to make.  Stay tuned...
Pin It

LinkWithin

Related Posts Plugin for WordPress, Blogger...