Saturday, May 31, 2014

Backyard Steller's Jay Nest - The Babies Hatched!

This isn't my image, but this is what the loud birds in our yard look like.  They have been there since we put up a bird feeder the summer before last.  They are large and they are loud, and they like to make noise early in the morning.  They are pretty birds, though, and stay year-round.
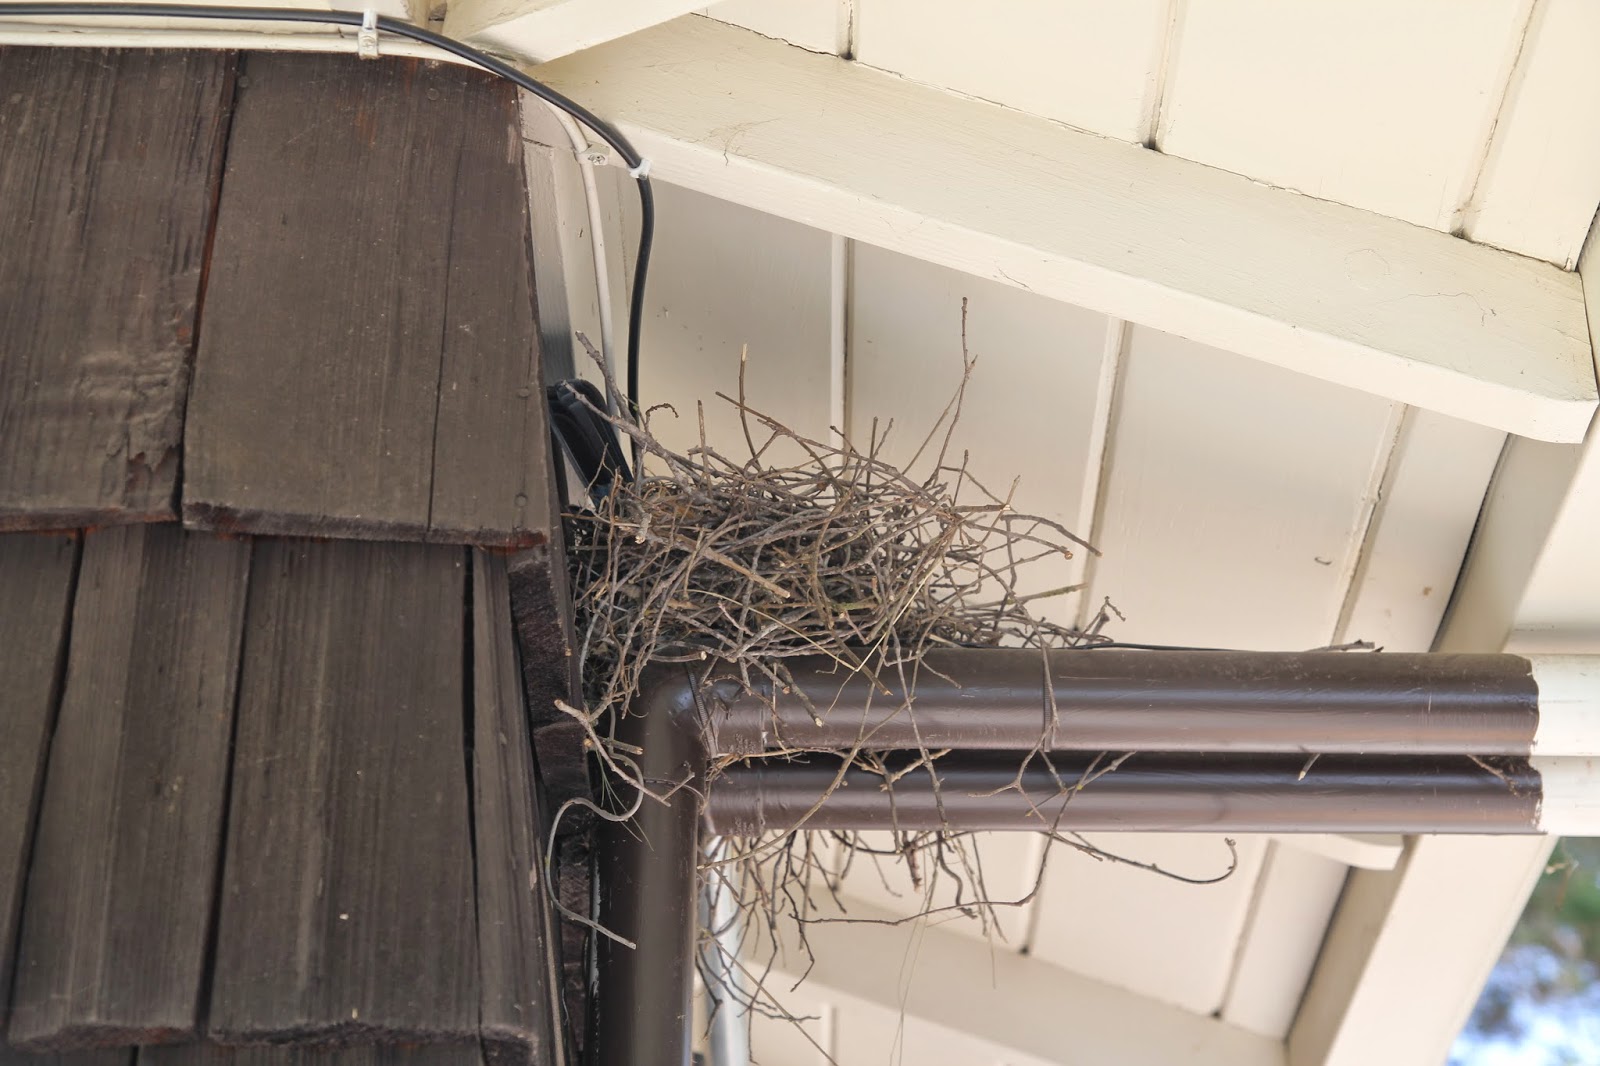
We looked up one day, about 3 weeks ago, and noticed a huge nest made of huge twigs on top of some pipes.  We noticed it belonged to one of the "blue pointy-head birds" that live in the yard.  Look how huge those twigs are!


Yesterday we noticed a baby bird chirping noise under it, and was happy to realize she had her babies!  When we see her tail (like in the photo), it is quiet there.  It is chirpy when we don't see her tail.

This is also not my image, as we haven't looked inside the nest.  But we looked in our bird book this morning and found out she is a Stellar's Jay.  We learned they lay 4 eggs and the incubation period is 16 days.  Beautiful eggs!
This is how close her nest is to where we hang out on the side of the house.


This is (obviously) also not my image.  We found this online after learning that they are black to start, and as they feather out, blue tail feathers come in first.


Not my image, but what a beautiful feather!  I am surprised we don't find more like this laying around.


Pin It

Friday, May 30, 2014

Cozy Coupe Making a Return to Home Depot


Pin It

Thursday, May 29, 2014

Building a Greenhouse Part 7: Shelves

We had a NORBO Ikea folding table laying around, and I liked the idea of having a workspace when I needed it, and open space when I didn't.  I installed it, but, as you recall, the studs aren't at 16".  So I attached a 2x4 the width of the table to the existing studs, and another one down a stud, and attached the table to that.  I put leftover 1x3s in the space between the table and the wall to remove the gap.


We primed and painted some leftover plywood (from the floor) and made two shelves out of it along the siding side of the greenhouse.  We didn't want to block any sun with our shelves, but wanted space to put wider plants.


Way on top are some shelves made of leftover closet material.  I attached it using scraps of 1x3.  I wanted shelving that wouldn't block the light.


Between the studs on the light sides of the greenhouse are pieces of plywood and scrap 1x4s and 1x3s cut to the width of the studs as shelves.  They are at different heights so we could screw them in from the opposite side of the stud and for visual variety.  We also wanted as much space as possible in which to walk and wanted to minimize light blockage.

++++++++++++++

Here is a finished exterior photo, with the coop so you can see how far away the coop and greenhouse are.


++++++++++++++++++++++++++++++++++++++++++++++++++
Pin It

Wednesday, May 28, 2014

Building a Greenhouse Part 6: Interior Trim/ Caulk

We have the lingering issue of air leakage at the window and door.  The interior trim is an attempt at tightening up the seal at each.


It also helps keep the insulation attached, and adds a bit of style (I also added a thermometer).


My younger helper and I also caulked a bit.  There were gaps at the corner posts, and we also caulked along the edge where the tile meets the floor studs, and at the door and window.


++++++++++++++++++++++++++++++++++++++++++++++++++


Pin It

Tuesday, May 27, 2014

Building a Greenhouse Part 5: Plumbing

As you may recall, we added plumbing to the chicken coop last fall.

The greenhouse is fairly close to the coop, so we decided to plumb them together and add a spigot to the greenhouse.  We didn't do a drain, thinking we will hold a bucket under it and water the plants with any waste water.  Stay posted to see how that turns out.
The spigot is in the door corner.  You can see the PVC going down, and jogging out and down through the studs and flooring.


I again neglected photography when we dug across the chicken yard.  This time, though, we were fending off chickens, who love nothing more than freshly dug holes and their worms.  We went down (the pipe wrapped it for winter), then across, then between the coop and compost bin and tied into the coop water.  The shut-off valve is a bit lower then ideal, but it turns off all the water to the area, which is nice.  You can never have too many shut-off valves.  

I have since painted the new pipe brown and covered up the exterior portion (shown here).  The part that was never photographed was covered up shortly after it was glued closed.  Those chickens sure excel at digging.


++++++++++++++++++++++++++++++++++++++++++++++++++

Pin It

Monday, May 26, 2014

Building a Greenhouse Part 4: Tiling

After every tile project around the house, we don't return the extra tile.  Why? Maybe we will need it someday.


Well, that day has come.


This design is courtesy of my older helper.  It is made from all of our old tile plus five extra feet of tile we bought.  He did a really nice job, I think, and we didn't need to use the tile saw.  A few grout lines are a bit thin, but I really like the look of it.

Here he is, with the one foot piece of tile he begged for and loves (yes, he is a bit flushed.  It is a bit hot in there since we added the insulation.  Yes, we are drinking water).


++++++++++++++++++++++++++++++++++++++++++++++++++


Pin It

Sunday, May 25, 2014

Building a Greenhouse Part 3: Exterior Trim/ Flashing, Insulation and Backerboard (for Tile)

 Exterior Trim/ Flashing

I managed to find 1x3 pieces they call "furring strips" which aren't that expensive and paint and prime up nicely.  We use "swiss coffee" for all of our neutral white-ish needs because it is pre-mixed at Home Depot (i.e. saves 10 min per trip).   I cut these and attached them all around the exterior to gussy up the place a bit and help close the air leaks at the door and window and am happy with it.  I measured the corners and attached them to each other before attaching them to the greenhouse, which helps the corners look more closed.


For the tops and sides, I got metal flashing painted white.  I installed it with roofing screws just under the roof glazing (and over the trim) on both sides and over the trim and flashing in the back (yes, I neglected my photographic duties here). 

Fingers crossed for me for the winter that this keeps the rain out!! 


Insulation 

We decided to use thick stryofoam insulation on the interior where the siding is.  This turned out to be really messy, with little balls of styrofoam all over.  I covered the top edges with silver flashing tape we had left over from a window project so the kids wouldn't pick at it.  I left the silver reflective side facing in, and uncovered.  

 Backerboard (for Tile)
Cement board (aka backer board) for tile comes in 3x5 pieces, so we got two of the thinner variety.  It cuts nicely with my circular saw as well, although it is really dusty.  

[Here is a side note- check out my window opening.  You can see the additional stud sideways below it, and the stud keeping it up.  That is my kids' step, so they can climb out the window without breaking anything- and end up on the ladder.]


We put in the backerboard and used yellow drywall tape at the seams.

++++++++++++++++++++++++++++++++++++++++++++++++++


Pin It

Saturday, May 24, 2014

Building a Greenhouse Part 2: Siding/ Glazing and Doors Windows


It is interesting to be writing these posts with so few photos.  We were so busy- with pockets overfull and work aprons bursting full- that the camera remained out of sight.  

Anyway- We re-did the framing.  And put on the thick plywood floor (with zero photos of that-- my kids were champs with the hammers-- and we snapped a chalk line to mark the joists).  We chose thick plywood because my floor joists are a bit further than 16".

Then we found polycarbonate roofing material at Home Depot (aka GLAZING).  They also have these little foam pieces that fit into the gaps to seal the air out, as well as roofing screws with washers with gaskets on them.  I don't like the look of the foam pieces, but used them instead of their plastic counterpart because they looked cheaper and easier (I later covered them with trim).

I wanted to use the glazing only where the sun would hit, and in as few of cuts as possible.  I was under the impression it would shatter with my handy circular saw.  Online, I saw that people used a plywood blade (many teeth), or tin snips, or made their line in masking tape then cut through the tape.  I am here to tell you it is a load of baloney.  The regular circular saw blade works just fine.  It is a bit loud, and my eye protection was worth every penny, but I had no shatters and my lines were cut fine.

So... we put plywood siding below the glazing on the front and back, and on the far side (and the close side next to the door).  I should have painted the siding before installing it, but  we live and learn.  We chose our house color (dark brown) after priming it.  I pieced together the glazing on both sides, and will apply silicon seal where the pieces meet.


On the door and window, the glazing is on the interior.   My husband thinks this is a terrible idea, and is inviting rain problems for the winter.  I did it because I don't like the look of the foam from the outside.  He is probably right, so stay tuned come winter.


++++++++++++++++++++++++++++++++++++++++++++++++++


Pin It

Friday, May 23, 2014

Building a Greenhouse Part 1: Framing


No need to be misled by the lack of photos at this step.  This step of greenhouse building was far and away the longest for us.  

We first had to choose a building site.  This is the site we chose.  It is in our chicken yard, and was our third choice.  The first two choices were on concrete, and in our side yard.  They were quite convenient, but not so sunny.  

This location is south-facing, and has plenty of sun.  It is, however, surrounded by chickens (read- keep the door closed) and requires a pass through a gate for entry (imagine a flooded winter/ rainy season gate).  There is a jog in the fence just here, so we debated over and over the door location, and opted for it to be on the house/ fence jogging side and have it only partially open.  

Next we had to come up with a design.  At Home Depot, we found concrete pillar foundation blocks in the garden department (like we used for our first chicken coop*) and went to the Simpson Strong Tie department to find the metal piece to tie the block to a post.  We were greeted by the Simpson Guys, who gave us a brochure and some advice.  We basically ended up using their Dog House Plans and modified them as needed; for example, by adding the foundation blocks.  We bought some "send-offs" for each corner post, as well as joist hangers and 2x4 stud hangers.  Our dimensions were to be 6'x4' (or, rather 6'8' by 4'8" once you add in the length and width of the corner posts).  The corner posts are 6' tall.


We built the window and door at this stage (check them out in Part 2) so we would know where to place the side studs.  We placed the side studs and floor joists [fairly] evenly spaced across the sides.  

If I would do it again, I perhaps would choose to actually do them 16" apart for ease of buying building materials (like fluffy insulation), and lay out the plans based on this, rather than that posts come in 10' lengths and my car prefers to drive 6' home rather than 10' long on the roof.  But with a fun project like this, it was a bit difficult for us to see too many steps ahead.  With the next project, I think spending the time to make a full building plan and materials list and hiring someone to deliver it once could actually be useful.

So... the kids and I put in the studs and floor joists and we even attached roof joists with a miter cut.


Then my husband came home and told us the studs were sideways, which would make the plywood installation exceedingly difficult, and that we needed to take it down and re-do it properly.  He also told us we needed four roof pieces, not three.

So... no more photos of this step.  But we did what he suggested.

++++++++++++++++++++++++++++++++++++++++++++++++++

+++++++++++++++++++++

* Here is our first coop, which was built on pillar foundations.


Pin It

Thursday, May 22, 2014

Fava Beans: Why Cooks should Love them as much as Gardeners Do!

[Organic] Gardeners love fava beans as cover crop.  They are great for the winter: they grow easily, have pretty flowers, and add nitrogen to the soil.  Plus, you can eat them.  What's not to love?


Ok, ok.  I know they are a lot of work in the kitchen.  It's two steps.  Or three!  

But with a kitchen full of helpers, it is easy to make quick work of this delicacy.  And I call it a delicacy because they are so much work that you won't do it many times per year.  BUT-- try it!  


These two little bowls were two half-full clear plastic grocery produce bags' worth of fava beans.  It took me, a toddler, a preschooler, and a friend less than an hour to make this (and the friend wasn't there the whole time).  Plus we ate some and it was good fun.

Ingredients:

Fava Beans (bigger are easier)
a bit of cooking oil (butter, lard, coconut oil)
a bit of olive oil
ice water with ice in a bowl


Directions:

Shuck the fava beans and discard the outer shells.  Blanch them (throw them in boiling water for three minutes).  Immediately put them into an ice water bath with plenty of ice.

Then take them and shuck off the inner layer.  Yes, there is another layer to remove.  It is fairly thin, and the beans pop out easily after they are blanched.

Heat the cooking oil in a cast iron skillet.  When it is hot, add the fava beans until just browned, about 1 minute.  Remove and add olive oil and sea salt.

You can eat these plain, or put them into a sauce (like tomato), or another dish. Enjoy!


Pin It

Wednesday, May 21, 2014

Hiding the Kitty Litter Box in the Vanity

Here is our bathroom BEFORE.  Please note the litter box beside the toilet.  The food and water for the cat are hidden by the vanity, but they are to the left.


Our first step was to find a litter box that fit in the vanity.  In this case, we had a short Ikea bin (Trofast, in green) that was a good size.  I took everything out of the space under the sink and hung a nail for the litter scoop.


I was set to use a Sawzall on the wall of the vanity to make the cat a little open hole to hop through.  Then my husband got home and said I should do it on the back side (the one you see from the toilet, not the room).  He also said I needed to put a cat door in the vanity, and if I was doing that, I might as well put it in one of the doors.

Stumped.

So we ended the night with me choosing an inexpensive and not fancy pet door on amazon and waiting.  I introduced the cat to the new litter box and took the door of the vanity off so none of us would close it by mistake as we waited.


The cat door arrived and I eagerly measured and cut and installed the door, then brought it to the vanity to test it.  

BUT...

When it swung in, it hit the lip of the litter box! No swinging!

Oops.

So now we have a vanity with a hole in the door that is cat-sized and she can use.  I may have to paint the cut edge.  We also have a lot more open space in the bathroom and less of a smell in there.

All in all, I am really quite fond of all the new space in the bathroom, and the lack of litter being dragged on her paws next to the box.


And yes, next time I will measure the door against the vanity before I cut and make sure the height is correct.


****UPDATE: She can't get in the door! It has been removed until further notice. Oops.******

Pin It

Thursday, May 1, 2014

Monthly Garden To-Do List: May


Cherries! Blueberries! Strawberries! Peaches!  The summer fruits are here.
  • It's a nice time to plant sunflowers.  These are annuals, but they do drop their seeds and could naturalize, depending on the variety.  Try a few heights and colors.
  • The lavender is flowering.  Cut a bunch and bring it inside.  Lavender has been known to aid in sleep, and it you can also cook with it.  Put some under your pillow to help you sleep.  Or find a recipe and add some in; there is a nice vanilla lavender cupcake recipe online- look for it.


What's Ready?

  • Apples
  • Arugula
  • Beets
  • Broccoli
  • Cabbage
  • Carrots
  • Chard
  • Cherries
  • Fava Beans
  • Garlic
  • Green Garlic
  • Kale
  • Lettuce
  • Peas
  • Radishes
  • Spinach
  • Strawberries
  • Turnips
Pin It

LinkWithin

Related Posts Plugin for WordPress, Blogger...