Tuesday, December 31, 2013
Wednesday, December 25, 2013
Fireplace Remodel Part 3: Natural Stone Mantle, Mounting the TV, Gas Logs, Decorating
After changing out painted white brick (which had been floor to ceiling) into Ledgestone (Part 2), and making a new firebox out of fire brick, there was a spot of brick on top that couldn't be removed and had to be chisled down, mortared over, then spackled over and then painted.

At the same time, the mason was choosing and cutting and piecing together a natural stone hearth and mantle out of Montana Bronze natural stone. This was quite an impressive feat. They are all the same height, the edges are square, with all cut edges facing inwards, and there is variety and interest in the pieces and how they fit together and how the colors look. We are really happy with his work.

At the same time, the mason was choosing and cutting and piecing together a natural stone hearth and mantle out of Montana Bronze natural stone. This was quite an impressive feat. They are all the same height, the edges are square, with all cut edges facing inwards, and there is variety and interest in the pieces and how they fit together and how the colors look. We are really happy with his work.


It works!
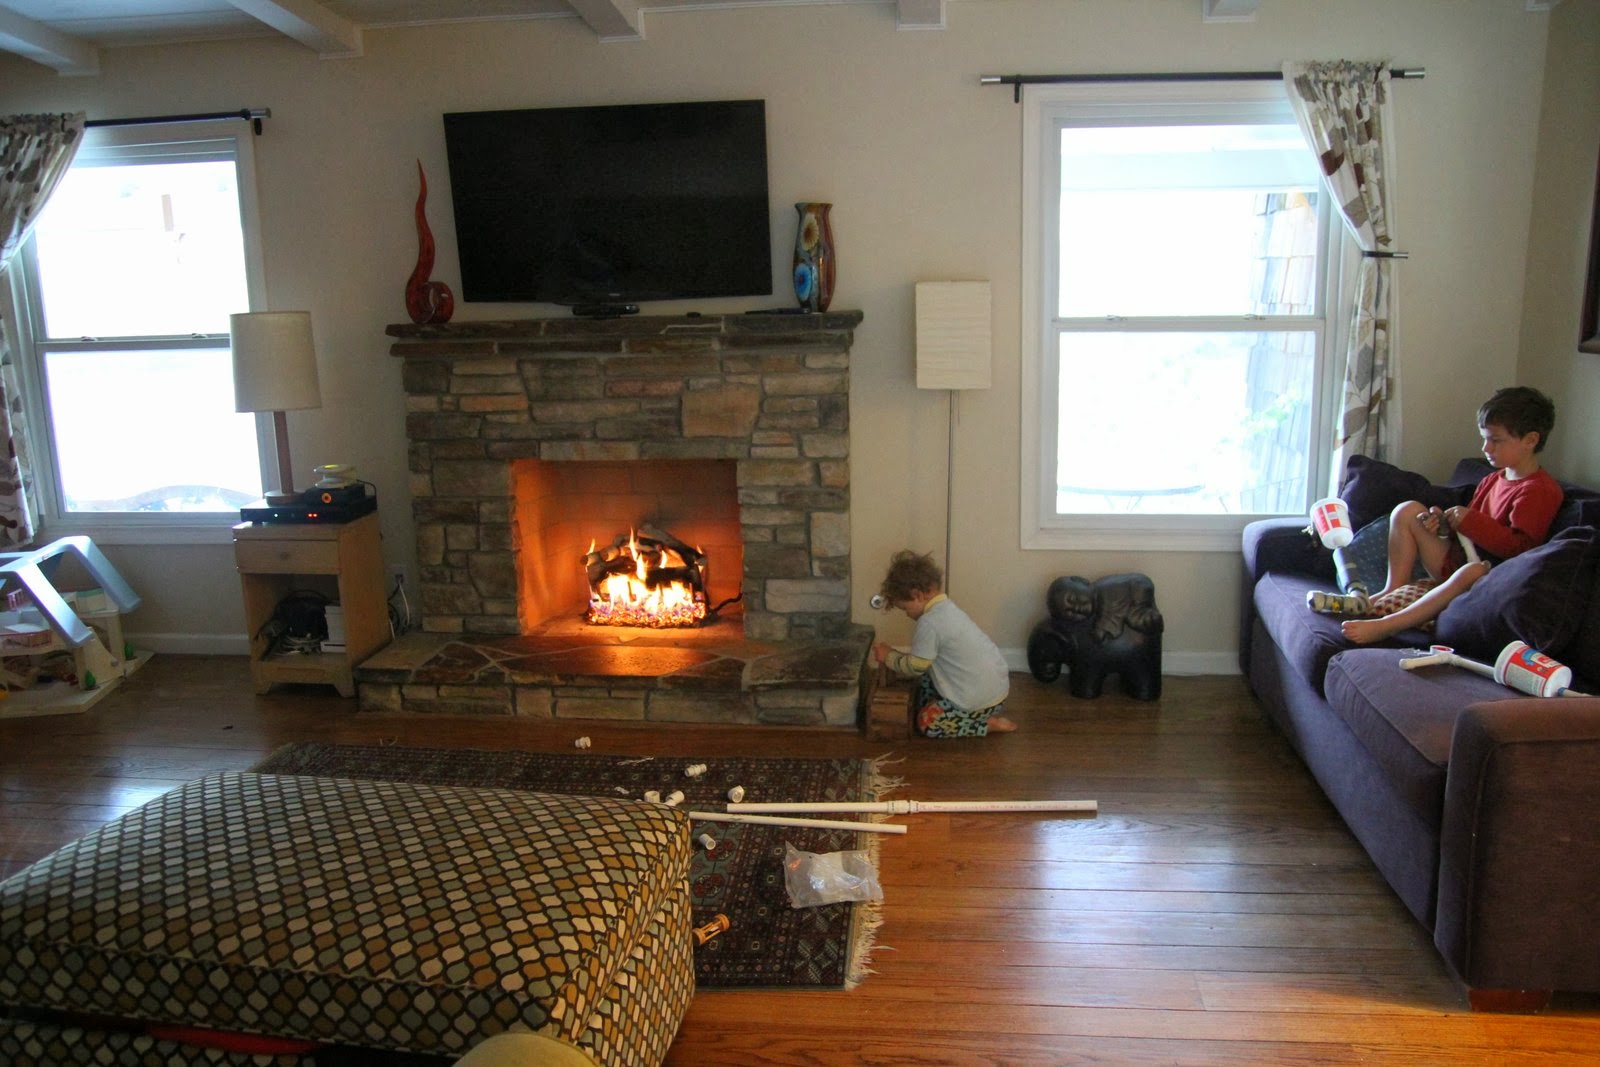
Then we got to find a piece of furniture for the TiVo and other tv gear. It had to be narrow enough to fit between the fireplace and the window, and it had to have a drawer, and an open front shelf for the remote to work. You can see we also got a tall decorative piece for each side of the tv (thanks, Pier 1!~ red glass flame, vase, sticks).

Next up: we need to think about the lighting in the room. The issue is that the switch works the left lamp only, and we used to have two matching floor lamps (one on each side). It's fine to have one on the switch and turn the other on manually, but it would be nice to have a matching floor lamp and table lamp. OR to figure out what lighting to use that would be permanently mounted and wired in: sconces, track lighting, a ceiling light somewhere (it's painted wood and gets higher as you go away from the fireplace)? Ideas welcome.

++++++++++++++++++++++++++++
++++++++++++++++++++++
Tuesday, December 24, 2013
Fireplace Remodel Part 2: Bricks to Ledgestone, the Firebox, the Gasline, and the Electrical
Here is the interior before. We had a sub-woofer speaker inside the firebox and had never made a fire inside. That cloth had been covering our TiVo and other boxes for years (I remember buying it in 2000, before I had a sewing machine as an adult! I used it as window coverings in an apartment in SF...), and let just enough light through so the remote would work and kept it all covered so the kids wouldn't see it and play with it.
The chimney sweep (see Part 1) said he thought that the previous owners had likely painted the brick white to sell it and to cover any black over the center area because the damper is frozen slightly open and there is a down draft into the house (which we had hardly noticed because we had kept it blocked).
The chimney sweep (see Part 1) said he thought that the previous owners had likely painted the brick white to sell it and to cover any black over the center area because the damper is frozen slightly open and there is a down draft into the house (which we had hardly noticed because we had kept it blocked).


There are quite a few local regulations regarding wood fireplaces and days to burn as well as code regarding how you can remodel and change a fireplace. After speaking with a few people, we learned that we couldn't lower the firebox and decided that the top bricks were likely a facade. We also learned about minimums regarding space between the top of the firebox and top of the mantle, as we wanted it as low as possible to keep the tv from getting too high.

We also decided to replace the fire box brick on all the walls, as it was patched already and we didn't want to have to replace it down the road.
Here is the new gas line. It comes into the right hand side of the fire box to make the connection to the gas logs easier later.

Here are the bricks coming down. We learned it was, indeed, a facade. And, much to our delight, there was sheetrock behind the brick. There was also trim for the ceiling.

On the left here, you see some drywall cut out. This was for the electrical and tv wires. My husband put in conduit for the tv wires and an outlet at the top. He did conduit with a face plate at the top and the bottom, thinking it would be easier to change wiring at the bottom than the top as technology changes.
One of the contractors with whom we spoke said that everyone does an HDMI cable outlet at the top these days, and you run it from there to somewhere in your house, where the TiVo and other boxes are kept. He said they don't have to be in a sight-line because of the Harmony remote and other technology I didn't catch the name of. We didn't do that because my husband liked his idea better for thinking of how fast technology changes.

There were some spots where you could see straight through the exterior brick and see sunlight when the drywall was off. We used spray foam heavily here.

The fire box brick is out, and the painted brick is coming out...

... then being built back up...

...for a base mold for the new exterior.

We chose Bucks County (color) Country Ledgestone by Cultured Stone. The mason recommended Chardonnay as the color, but we liked the bit more variety in the Bucks County. This is manufactured stone, and has corner pieces, and quite a variety in shape and color.

Now the wall is coming back together...

... bit by bit...

...almost there...

++++++++++++++++++++++++++++
++++++++++++++++++++++
Monday, December 23, 2013
Fireplace Remodel Part 1: The Chimney
 This is the best "before" photo we have of the exterior of the chimney (love our local wild turkeys). We decided to turn the fireplace into a gas-burner, and remodel it, and mount the tv above it. The first step was to call a chimney sweep to get the status of the chimney, which we had never used. He said it was fine, save for some loose bricks on top and the firebox (where you make the fire) on the inside has some cracks in the mortar which had been patched. He also said it was a terra-cotta liner inside, and entertained us with his chimney history lesson and then put on a full black suit with a respirator as he cleaned it. The kids are still talking about that.
Then we found a local mason to come and patch and repair the chimney. He suggested turning the top layer of bricks at an angle and having them come slightly outwards as a decorative touch, and we agreed it would be nice. He also (not shown in the bottom photo) caulked and painted the flashing at the bottom dark brown to match the roof.
 |
| The kids are making castles from extra bricks. |
++++++++++++++++++++++++++++
++++++++++++++++++++++
Pin It
Saturday, December 21, 2013
Kwik Sew 2911 Fleece Vest as a size 6
Our last Kwik Sew 2911 Vest modification (to make it a 6T) has been a big hit... so I had to make a second.

The patches are a Girl Scout Patch from one of his teachers and a Boy Scout patch we got at an estate sale.

The patches are a Girl Scout Patch from one of his teachers and a Boy Scout patch we got at an estate sale.


Thursday, December 19, 2013
Kids' Sewing Project
My 5.5 year old made this on my machine, basically unsupervised.

Check out the tree stitch on the edges.

Check out the tree stitch on the edges.

Wednesday, December 11, 2013
Plumbing Repair (Brrrrr... Burst Pipes)
It has been so incredibly cold here.
The top photo is what we stumbled upon. This is burst in two places, the left white elbow (which leads through the fence and into a spigot) and the pipe in the center (painted black) leading up to a spigot.
In the bottom image, you can see what we did:

What was left to be done:
Pin It
The top photo is what we stumbled upon. This is burst in two places, the left white elbow (which leads through the fence and into a spigot) and the pipe in the center (painted black) leading up to a spigot.
In the bottom image, you can see what we did:
- Turned off the water at the street.
- Cut the damaged PVC off and measured to see if it was 1/2" or 3/4" pipe (it was 3/4").
- Tried to remove the PVC from the galvanized threaded connection on the bottom left. We couldn't do this and had to wait until reinforcements came home from work. We tried twisting and cracking the PVC and nothing worked.
- Made a shopping list and went to get the missing parts.
- For the black spigot, we used a coupling to connect the broken pipe onto new pipe. Then we used an elbow onto a short piece of PVC onto a threaded connection onto a new hose bib (the old one was impossible to remove). The unthreaded connections were sealed with blue PVC glue and the threaded connections with teflon tape.
- For the spigot through the fence, we cut a length of PVC to replace the broken PVC through the fence. On the other side, we put a PVC threaded connection and a new hose bib. On this side, we put an elbow and set the extra PVC and connector piece to be threaded into the galvanized piece once said reinforcements could get home from work and help get the old piece out of the galvanized part.

What was left to be done:
- Remove broken threaded PVC piece from galvanized piece on bottom left.
- Thread the new prepared piece into the metal piece using teflon tape.
- Blue glue the last connection together.
- Wait for glue to set.
- Optional: black paint the center spigot.
- Turn water back on (after glue sets).
- Assess and see how we did.
- Optional: wrap pipes in insulation of some sort.
This was really fun. Especially after doing some PVC plumbing for the chicks the other day and needing to cap another line after it burst two days in a row (the first day we used a PVC cap and the second day we used a galvanized cap). For this other cap issue, on the third day, the connection to the cap sprung a leak and we found a different shut-off valve. This one still needs to be repaired. A story for another day.
Regardless, the kids got really into this project and were really good helpers and really patient and interested. That doesn't mean I won't be excited when the cold spell ends.
Tuesday, December 10, 2013
DIY Wooden Chick Brooder with DIY Poultry Chick Waterer
We recently plumbed the chicken coop (see posts 1, 2, and 3). In the end, the chickens don't use it because they don't know what it is.
This time, with the newest batch of chicks, we want them to use nipple waterers from the beginning. Maybe they will teach the older ladies a thing or two when they move out of the brooder.
So... you can buy a Cheery Chicks pre-made chick nipple system for $30, or we made our own. Here it is:

As you can see, it is a yogurt container with 1/2" PVC fed into a hole we drilled and silicon sealed. There is a PVC connector screwed into the top and bottom of it. This is the weakest link of the waterer-- it really needs to be tighter. An O-Ring would probably do the trick (one inside and one outside, then the silicon sealant).
Then comes the 1/2" PVC. This feeds into an elbow from 1/2" to 3/4" (switched because the poultry waterers need to seat into 3/4" PVC). Then there is the 3/4" PVC, the nipple is screwed in, and a 3/4" cap is at the end.
Below is our brooding box (DIY) before we attached the waterer and roost bars. It is made from a few old shelves and some hardware cloth at one end. The one end is higher to attach the heat lamp, and the other end is mesh for air flow and is staple gunned on.
Not pictured is a piece of hardware cloth that sits on top to keep the cat out.


Here it is with the waterer attached. We drilled a hole in the side of the brooder to fit it through. The water container is screwed onto the outside. This way, debris will stay out and it won't get too hot or take up space-- or get roosted upon/ dirty.
If you look closely, you can see we modified the waterer so we could remove it. Between the 2/4" to 1/2" elbow and the nipple, we added a screw connection. We wanted to be able to move the chicks as they grow and to be able to use this waterer the whole time.

You can see the heat lamp height here. You can also see the roost bars we added by cutting two lengths of bamboo and drilling holes in the sides of the box.


Plumbing the Chicken Coop Part 1: The Line and Spigots
Plumbing the Chicken Coop Part 2: The Nipple Waterers and Bucket
Monday, December 2, 2013
Ladybug Vest
The little guy loves ladybugs these days, and wanted a ladybug vest. So I pulled out Kwik Sew 2911 and got to work.
Since I wanted it to be warm, I found a fleece that was to be the lining. I got to cutting, and realized I didn't have enough of the ladybug fabric to cover the whole thing.

So the back and hood got racing stripes.
Since I wanted it to be warm, I found a fleece that was to be the lining. I got to cutting, and realized I didn't have enough of the ladybug fabric to cover the whole thing.

So the back and hood got racing stripes.

He put it on! And liked it!

Stop the paparazzi, please!

Sunday, December 1, 2013
Monthly Garden To-Do List: December/January
We have a short frost season here and it is upon us. Now is the time to keep an ear out for when it is due to frost and protect your citrus and avocado trees, especially the smaller ones. You can also turn off your irrigation, and plant those new bare root trees.
What's Ready?
- apples
- arugula
- beets
- bok choy
- broccoli
- cabbage
- carrots
- celery
- leeks
- lettuce
- mandarin oranges/ citrus fruits
- onions
- spinach
- sweet potatoes
- turnips
Kitchen Tasks
- Make more applesauce, apple butter, and apple crumbles.
- Use that slow cooker for some hearty soups. Try some new veggies that are ready now, like turnips.
- Don't forget those cabbages. They make great soup, meat wrappers, and sauerkraut. They are high in Vitamin C and fiber, and store well.
 |
| That's a lot of sauerkraut fermenting! |
Garden Tasks
- Split your strawberries. Look at the plants and by now the babies that have shot off should have their own roots growing. You can let them stay and root where they are, or clip them when their roots are about an inch long and plant them elsewhere.
- Plant bare root trees! Plants do better when they are transplanted when they are dormant.
- Turn off your irrigation - the rains are here! Turn it back on when a week or 10 days have passed since the last rain. You are probably safe to have it off from mid-November through March or longer.
- Keep an ear out for when it is due to frost and cover your citrus and avocado trees. Bouganvellia also needs to be covered, as do smaller birds of paradise and other various plants (you should find out which of your plants are not frost-tolerant). There is special frost cloth that allows sun in and raises the temperature a few degrees inside so the plants are less likely to die on those really cold nights.
- Don't forget to take the basil inside if you want it to be a perennial; if not, it will die after the first frost.
Happy Holidays and Happy New Year!
Subscribe to:
Posts (Atom)