Friday, November 30, 2012

Homemade Ottoman (Little)


My 4-year old and I have been working on this ottoman for about a month.

I am not kidding.

We only do it when the littler guy is sleeping, and not every time.  Our first step was to take a piece of plywood and cut six equal pieces out of it.  We labeled them for which side they would become.  Then we screwed the sides and bottom together using the drill.  Then we found a hinge and put it on the top piece.

Then we cut foam for the top and bottom, and fleece.  Then we handstitched the top (I did the edges and he did the decorative stitches).  Then we stitched the sides, then the inside.

Lastly, he decorated it with stickers and we hot glue gunned a piece of leather on one side and a piece of fleece that had been covered in tape (to act as casters and help it slide) onto the bottom.

I think his intention is to put toys in it, but for now we just play with it.
Posted by Picasa
Pin It

Thursday, November 29, 2012

Kids' Wheelbarrow Handle Repair


I forgot to take a "before" photo!

So-- "before" -- the handle was broken in two pieces.  We had tried wood glue- to no avail. Twice.

This worked on our second try (on the first one, the wood split- it was too thick).

On this try, we screwed paint mixing sticks on both sides of the broken piece as a mending plate of sorts...
(here is a real mending plate example...)

and now it works! We don't have to buy a new wheelbarrow! Whew!

Posted by Picasa
Pin It

Wednesday, November 28, 2012

Topeak Baby Seat Review

We LOVE our Topeak Baby Seat.  It has gotten so much use, and has actually been in two falls (both at 0 mph) with the rider getting slightly bruised and the baby with no visible marks.  The seat is rated to 48.5 pounds, and I am sure we will get there, as the 42 pound older child of ours still LOVES riding in it (he relegates his younger brother to the trailer most of the time, which is fine by me, as the whole load feels lighter when he is up top).  It adjusts sizes easily, and is even easy to swap kids in it on the road.

We chose the Topeak because I already had a Topeak rack and all of their stuff is interchangeable and slides on and off (I had a bag and DH had a computer case).  We wanted a seat that would be easy to change mid-ride (so one of us could ride our son there and the other could ride him home- when we just had one).  I was also interested in the "roll bar" aspect of it-- supposedly the higher top acts as a roll bar of sorts (yes, you must put your child in a helmet at all times).  I wanted a rear instead of a front seat so that my riding wouldn't be infringed upon, and so that my body would break wind and debris for the baby.

Here it is, with the now 4-year old when he was 10 months old, getting the straps set right for its maiden voyage.
After having used it for three years now, it has been all that we wanted. It is safe, easy to use, and comfortable for rider and child.  It is easy to put on and off the bike.  It is easy to get the kid in and out, though we never raise the front bar to do so.  The foot straps for the child are secure, and we use them with the older child but not the baby.  It can be quite annoying to be riding along and have a foot in your hamstring (or elsewhere!).

With the rear seat, a drawback is that the seat takes up all of your storage.  I ended up getting a clip-on front handlebar bag and not carrying anything extra, and wrapping my lock around my seat post.  I have also gone shopping and locked my goodies to the back of the baby seat and had them flop along on the way home, but this has been quite rare.  It only just recently occurred to me that I should sew a bag for the back that attaches to the baby seat, or panniers that are half as wide and fit under the seat and attach to the rack.  The lack of storage is quite annoying.  So annoying, in fact, that we are looking into proper cargo bikes.

All in all, we have gotten so much use out of this seat and highly recommend it.


  Pin It

Tuesday, November 27, 2012

Cookie Cutter Chipatis

 
We are still making chipatis, but just came to a new twist on them.  We make them-- but instead of just rolling them out, we roll them, and then they get cookie cuttered into different shapes, then they get cooked! Yum (plus entertainment)!
Pin It

Monday, November 26, 2012

Burly Bee Trailer Review

We have been biking along with the Burly Bee behind us for a while now, and I haven't done a review.  Yipes.

So-- overall-- I like it a lot-- it solved a problem for us for less than $300 (it gave me my bike back, essentially, after having a second child).  It has some drawbacks, but it also has a lot of strong points. I am so happy we found it, but it is getting heavy as my load is gaining weight, and it's getting a bit cramped for him back there.  Also, a new(er) issue is that both kids want the baby seat, and neither wants to sit all the way back there in the trailer where they can't talk to Mom.

Pros:
  • Can ride your regular bike with two or three kids (one on baby seat and one or two in trailer)
  • Has a roll cage so the kid/s don't necessarily need to wear a helmet (please use your own judgement here and look into local laws)
  • Bug screen keeps debris away in nice weather, and rain screen keeps kid/s dry (although the mud from the bike tires flies onto the rain screen)
  • love how it folds and wheel attachment - it is quick to fold and fits easily into my (small) car's trunk
  • it is light (20 pounds empty)
  • seat belts for two kids back there and an elasticized pouch on one side (this is also a con- one kid doesn't have access)
  • huge "trunk" in back - behind seat- fits two full grocery bags (plus whatever the kid will share their space with, of course) - we have gotten a half flat of strawberries back there, plus other Farmer's Market goodies, easily
  • Easily swaps from bike to bike - each bike has a forged standard hitch on the rear tire and it clips on in seconds
  • Nice big windows so the kid can see out 
  • Wiggly kids don't affect steering or stability 
  • Bike can fall over and trailer will stay upright

Cons:
  • not compatible with Burly's stroller kit (meaning you need a baby carrier once you get to your destination)
  • my flag fell off and we had to make a new one with bright orange duct tape (yes, they sell new ones)
  • not really room for two back there- it says max 100 pounds but my 42 pound child fills it up (and the 28 pounder does a pretty good job, too) - plus, if they were both way back there, all alone, who would mediate?
  • Kid can reach feet out the front and touch the rear tire with their shoes if they are so inclined
  • Hard to talk to kid all the way back there
  • Trailer tugs at bike and feels nearly as heavy to pull empty as full (and I say this with a 42 pound child)
  • Hard to stop on a dime and start up hill (or even up a slope) with a load - you need to downshift before stopping
  • They complain it gets hot back there on a hot day (no cross breeze)
  • Load from trunk can encroach into seat area and stab them in back if you aren't careful


  Pin It

Sunday, November 25, 2012

carving a mouldy pumpkin

 
We have had a LOT of pumpkins around the house, and they are getting a bit soft.  This little guy noticed one had mold, and cut into it.  Then he had to carve it into a special Jack-O-Lantern.  Pretty impressive (imitation and knife skills).

Posted by Picasa
Pin It

Saturday, November 24, 2012

DIY Bamboo Rolling Mat for Sushi


We like to make our own sushi, and recently the little guy noticed that they use a bamboo rolling mat at the store when they make it there.

So he said, of course, that we need one.

So we made one.  He found some bamboo skewers at the store, then we came home and taped them together with clear shipping tape, then covered it with plastic wrap (which the pros also do).
 
Posted by Picasa
Pin It

Thursday, November 22, 2012

Thanksgiving Leftovers Recipe Ideas

Leftover Turkey Thai Curry


2 T rendered fat or butter
1 onion, chopped
3 cloves garlic, chopped
1 leek, chopped, white part only
4 carrots, chopped
1 cup green beans, chopped
1 bunch broccoli, chopped
1 bunch kale or spinach
1/2 cup frozen peas
1 qt. homemade beef or chicken stock
1 can coconut milk
2 T Thai curry paste
2 cups chopped leftover turkey

Saute onions in fat.  Add garlic and leek.  Add carrots, green beans, and broccoli.  Add greens and stock and simmer until greens go soft.  Add peas. 

Whisk curry paste in a bowl with coconut milk until smooth.  Add to saute.  Add turkey.  Turn pan to simmer and let simmer until liquid cooks off~ about 10 minutes.

Can eat alone or on rice.


Leftover Turkey Tibetan Momos 

adapted from the Lhasa Moon Tibetan Cookbook


Basic Momo Dough

2 1/2 cups flour
3/4 cup water

Mix the flour and water into dough, and knead it well.  Cover and set aside while making filling.


Turkey Momos

1 lb. leftover turkey, finely chopped
1 large yellow onion, finely chopped
2 inches fresh ginger, finely chopped
4 cloves garlie, finely chopped
1/2 teaspoon red chili flakes
1/3 cup chives, chopped
1 teaspoon olive oil
1/4 cup water
3 stalks celery, finely chopped
1/2 teaspoon salt

Roll the dough into one inch balls.  Working on a floured board, press each ball into a circle and roll it flat.  Place a tablespoon of filling into the center.  Pinch the momo closed and into a crescent or round shape.  Steam for 10 minutes, keeping the momos from touching each other.  Serve with chili sauce.

Leftover Turkey Enchiladas


2 cups chopped leftover turkey

1 cup dried black beans, socked overnight in 2 cups water and 1 T lemon juice then drained and cooked in 2 cups water with a sheet of kombu seaweed until soft (45-60 minutes) or can organic refried beans in lard ("Eden Organics" has non BPA cans)
1 cup brown rice, soaked overnight in 2 cups water and 1 T lemon juice then drained and cooked in 2 cups water or stock  for 20-35 minutes, or in a rice cooker, optional
package sprouted tortillas (like "Ezekiel") or organic corn -masa harina tortillas
bunch kale or chard or package of spinach, chopped and thick stems removed
2 Tablespoons fat (butter, lard, or coconut oil)
1 onion, chopped
4 cloves garlic, smashed
1 can enchilada sauce (or make your own by sauteeing onion, garlic, tomatillos, and chilis in stock and blending together a la Nourishing Traditions)
1 package shredded cheese (jack or cheddar), optional

Saute onions and garlic in fat until soft (preferably in a cast iron skillet).  Add greens and saute until soft.  Add turkey and half of the enchilada sauce and stir to combine.

Put 1/2 of the remaining enchilada sauce on bottom of large glass baking pan.  Fill the tortillas with beans, rice, and the cooked veggie/ turkey mixture.  Fold bottom and top in, then roll closed.  Place in pan with roll on bottom.  Top with rest of enchilada sauce and optional cheese.  Bake at 350 for 20-30 minutes, or until cheese is melted.


Pin It

Monday, November 19, 2012

Tyke Toter Review

On our quest to find just the right family biking getup, I have been test riding like crazy and found the Tyke Toter. This is a seat and foot rest, and it clamps onto your seat and cross-bar and the kid rides between your legs, but the weight is in the middle of the bike, as designed.  Here is a photo from their website.  It is the orange pieces.


At first, we liked it, but thought it wasn't amazing.  It mounted quite easily, and I got us all loaded up on my own.  The directions say to load yourself then the kid, but I couldn't manage that without a grown-up helper.  So I put my older son on it, and had him squish forward while I shimmied behind him.  It wasn't ideal, but it worked.  On our test ride, we only made it to the end of our street and back-- not on the main road... I was too nervous and my husband was at work. 

I was nervous because I felt like I couldn't ride the bike safely.  The Tyke Toter is only rated to 45 lb (my older son is 4 years old and 42 pounds), so he was squished in to me and blocked my view of my handlebars (I guess I shouldn't be looking there anyway, but I have a habit of looking at my odometer, I guess). He said he liked it and was comfortable but I kicked him almost every stride. He liked having his own handle bars but the little guy wouldn't let us ride without him (on the rear seat) and the bike felt heavy/ immobile (though nice to try in actual conditions).  I wasn't used to being so close to him while riding, and, though sweet, I couldn't imagine being so cuddly on our 25-minute ride to school-- especially up hill and across traffic.


I had thought of keeping it and using it once I was confident that the little guy (now 17 months) could sit on it and have the big guy in the rear seat. The occupant needs to be able to sit on the seat and hold the handlebars and not fall off. I do like that if it fails the kid will be between my arms and on the crossbar. But I do like a bit more personal space (than I had on our test ride). 

It's a nice solution, though, and maybe quick release and exchange between bikes like they claim (we actually use this feature of the trailer and baby seat- I ride the kids somewhere and my husband rides one home sometimes)... the only reason it wouldn't be easy for an on-the-go child swap is if the bottom bar for the foot pegs was different in width by bike (they have you attach rubber shims using stickers on the foot peg portion based on your frame width).  I think it's probably not ideal but may be a nice solution for ages 2 and 3, although they advertise it up to age 4, which may be the case for smaller children.

In the end, I decided to return it.  That is because the day after the test ride, it was on my bike and time for school pick-up.  Instead of taking it off, I rode with it empty (and the trailer and baby seat on my bike for the kids to use).  This was fine for all of three strokes before I realized that I had been hitting my older child each stride because the seat was where my legs go when I pedal.  This meant my inner thighs were hitting the orange flat seat part each time I pedaled.  This couldn't be made better with a smaller child, so off it went, back to Tyke Toter.  


Pin It

Sunday, November 18, 2012

Madsen Test Ride

I have been eyeing the Madsen bucket bike for a while now and was lucky enough to test ride one.  REI had a return and they let me take it out (they don't usually keep them in stock -- and I used to see the bike on their website but don't anymore).  It was a blue one, and they were selling for $1,550.  It was super cute, though the plastic bucket was more plastic-y and flimsier than I had expected.  


Lo and behold.... I didn't like it at all!  

I brought both kids with me, and set them in the rear seat next to each other.  There was a lap belt for each of them, and plenty of room for them to sit next to each other facing forward.  There was plenty of leg room, and for kicks, my older son asked me to remove the other seat. It came out easily, as it had been velcroed in.  The benches themselves were cushioned and narrower than I had expected, and a lot of the kid rides above the bucket, which made me feel like they were pretty vulnerable to the elements.  The double kickstand was really stable for them to get in and out of the bucket.

After getting some help out of the store, and lots of stares, I was able to step through the frame and get on the bike.  Turns out the seat was a bit low and it was an easy tool-free adjustment to raise it.  I took a deep breath and got the bike going.  BUT it was in a low gear and I felt like I needed to be in a higher gear and fumbled with the shifters a bit and didn't find one.  Their workings weren't intuitive for me and I couldn't get any stability.  So I stopped, still in the parking lot, and had the sales associate hold the back of the bike so I could change gears without dislodging the quiet children.

Ok, try #2.  I got back on the bike, and turned a corner of the parking lot, aiming to make a loop then go onto the street.  I got it going, but felt really wobbly.  I tried picking up speed, knowing that speed makes bikes feel more stable.  It didn't help.  So I looped around to the store entrance, said thanks but no thanks, and had my curiosity satisfied.  The sales associate told me the previous owner had returned it because he felt like it was wobbly, and because his kids had tried to get out while it was in motion!  Thank goodness my children were calm and stable-- I can't imagine going on it with kids wiggling around.

All in all, I am so glad I got to ride the bike.  I really wanted to like the USA box bike.  But at 8 speeds and super long, I just didn't feel like it was up for the task of being my bike.  It was super wobbly and the kids were as far back as a trailer, and less protected.  I'm so glad I didn't have to buy and return it. Pin It

Thursday, November 15, 2012

Cooking with Kids for Thanksgiving

Just the word conjures up a cuddly and warm image of a family by the fire: Thanksgiving.  Just sit and imagine with me-- a couple of generations, some friends, a slight chill, some dogs at our feet, the smell of a turkey roasting, maybe John Madden announcing some football at a low volume in the background...

But then I think a bit longer and I remember the restless children pestering each other, the stress of getting the meal done and the the table set, running to the store for one more thing, and being stuck inside because of the cold.  Let's not forget the wishing we were in our maternity jeans after the meal and feeling bloated and like maybe we shouldn't have tried both kinds of pies after appetizers, wine, and a full meal.  Ahhhh- the holidays.

Don't get me wrong: I love me a good holiday meal as much as anyone.  It is the time leading up to the meal where I get a bit antsy.  And my progeny don't seem to fall that far from the tree (imagine that).

BUT-- involving the kids can be one strategy for making the day run a bit smoother.  One of my favorites is to just get them doing what I am doing.  So- in this case, it's cooking.  Making sure your baby is using a blunt knife and the older kids are using age-appropriate cutlery, here are some ideas:
  1. Have the baby bring you various items (like specific veggies from the fridge or a nice cold beer).
  2. Have your older child open the beer or wine (not kidding).  They can also open cans, and will-- with gusto.
  3. Have your toddler sort things (like beans into muffin tins or the cloth napkins by color).
  4. Have the toddler (on up) set the table.  Make it intricate with flowers or acorns, and have them sort them by place setting.
  5. Get the preschooler to cut the potatoes in half.  S/he can also paint them (and other roasted veggies) with olive oil and sprinkle with salt (that you have already measured. Trust me on this one).  If you prefer the shake and bake method (i.e. putting the potatoes into a container with a lid and shaking the seasonings and oil), you have just the person for the shaking.
  6. Have your child sample the foods.  We actually call it sampling at our place and talk about the Farmer's Market and Trader Joe's sample sizes.
  7. Have your child measure for baking and turn the food processor or mixer on.  Have them crack the eggs.  If you are anxious about the shells in the food, do it in a separate bowl first.
  8. My 4-year old LOVES using the coffee grinder for nuts.  Sometimes I think of recipes that need chopped nuts (or almond flour) just so he can use it.  Our favorites include an almond flour crust galette (similar to this but no sugar) or beet brownies.
  9. Have them make the whipped cream.  All it takes to make it fresh is full cream (we use organic raw) and a drop of honey and a teaspoon of vanilla, both added towards the end).  We whip them in the electric mixer on high until they are "stiff peaks."  Have them test it-- preferably with a fresh strawberry or other fruit...
  10. Have your child poke the holes in the pumpkin before you make pie.  First time using a fresh pumpkin instead of a can?  Here's the recipe: Poke holes in a fresh pumpkin (enough to let the steam escape so it won't explode).  Place it in a glass baking dish with an inch of water.  Bake at 350 for an hour, or until soft.  Cut it open and remove the seeds.  Scrape the flesh out and use this as you would use canned pumpkin.  One small pie pumpkin should yield 2 cups or so of mashed pumpkin.
  11. Have the baby (on up) rip the bread into small pieces for the stuffing.
  12. They could also break the ends off the asparagus or green beans.
No matter what task you have them help you with, it is always more fun to do it together.  Yes, it takes longer and is messier, but it is time and energy well spent, and in the spirit of the holidays!

Happy Holidays! Enjoy!!
Pin It

Saturday, November 10, 2012

why we returned our trail-a-bike


I didn't explain why we returned our trail-a-bike (here it is with us using it). It felt heavy and wobbly, and accentuated every move of its occupant.  Since it attached to the seat post, the baby seat couldn't sit on the rack at the same time-- which meant we could only take one kid per bike. 


Pin It

Friday, November 9, 2012

Nepal Travel Tips (many years overdue)

learn a few useful phrases (like how to ask for boiled water)
clothing tips- cover your shoulders and knees (men, too)
clean hand/ dirty hand (use the left to touch stuff and right to eat)

wild dogs (avoid them- carry a rock)
don't drink the water (or ice)
peel it

avoid flies on the food


don't eat fresh raw veggies

bring a sarong
bring 2 black bandanas
how to bargain (cut price in half as your starting point)
avoiding theft (carry items on your body, under your clothing)
visit Boudha
check out the sunrise

buy medications there and bring them back (they are all legit)
ride an elephant
try some tourist stuff like kayaking

trek a little- and carry a light pack (the tea houses have everything you need)


try to go to a wedding or a festival of some sort

Have so much fun!!  I haven't been there for so long! But it is such a wonderful place.

(and sorry my scans are at weird angles)

Pin It

Thursday, November 8, 2012

Self-Feeding Carrots and Almond Butter

 
Now that he is 16.5 months old, the little guy doesn't really like to sit in the high chair.

Okay, that is a bit of an understatement.  He refuses and arches his back.  So we put it in the garage.

Now he eats like his big brother, in a chair or a booster seat at the table, or at a stool at the bar in the kitchen.  In this instance, you see him eating on the kitchen floor, using our step stool as a table.

But the point of this post is not that.

The point is-- look! He likes to dip into almond butter and will use a carrot instead of a spoon.  Mmmmm...
Pin It

Wednesday, November 7, 2012

BOB Revolution Stroller Review

We LOVE the BOB  Revolution. It pulls you along, is super sturdy, and the front rotating tire is easy to maneuver. It folds up easily, and is good for running or walking, and even trails.  


It also reclines (for walking only) with a clip in the back, so if the little one falls asleep, you can recline them.  

Also, the storage underneath is big-- we can pick up our whole weekly farm box via stroller.  You have to buy the handlebar console separately, but it is nice for a water bottle, keys, phone, and a snack.


Overall, this is a great purchase.  We have gotten so much use out of ours. It is nimble and big, and still fits our big guy (42 lbs and 4 years old) when he wants a ride (yes, we carry an Ergo down below so the displaced little guy can have a ride then, too).


Pin It

Tuesday, November 6, 2012

Recipe: GF SF Almond Meal Olive Bread


Ingredients:
1/2 cup pitted brine-cured olives, cut into pieces
6 eggs
1 t sea salt
2 cups almond flour
 
Procedure:
Mix together.  Bake at 350 for 30 minutes. Enjoy!
Pin It

Monday, November 5, 2012

Toddler Activity: Cracking Nuts


Nuts are at our farmer's market, and one of the great benefits of the market to us is that the kids get a different, and more intimate, experience with food.

We bought a couple of walnuts in the shell last weekend (ok, the farmer gave them to us when we tried to give him 6 cents for two).  We got home, and had great fun going though the tools to find just the right one to crack it open.

In case you were wondering, pliers did the job.


Then we had to buy a bag of almonds in the shell when we saw them at the market the other day.


My goodness, what a great source of entertainment they have been.  For both kids.
Posted by Picasa
Pin It

Sunday, November 4, 2012

Matching vests failure

 
I had a lot of success with Kwik Sew 2911 when my older son was small (here) and also tried McCalls 3416 vest (here) and sized it down and found it ok, but more work to put together.  I made the Kwik Sew vest loads of times in sizes 1T through 4T, and most often made it as a vest but with the hood.

I thought it would be nice to make the boys matching vests for the fall, but Kwik Sew 2911 only goes through 4T and my older son is a large 5T.  So I could make one and extend it, or try another pattern.  I decided to make the McCalls pattern I already had, in the XS.  I made the smaller one in the Kiwk Sew 2T with the hood.  I used FOE (foldover elastic) as the binding on both.  I skipped the pockets on the Kwik Sew version, as per my usual, and included them in the McCalls vest.

I don't like how either vest turned out.

I don't like the smaller one because the hood sits funny.  The head opening looks small in proportion to the rest of the vest.  I should have pulled the FOE a bit, because the bottom and arm holes look wide and as if they flare.  I also struggled to match the FOE around the hood to the zipper, and I think you can tell where I shortened the zipper (and not in a good way).

I don't like the larger one because the pockets look sloppy.  The pattern has you hem them under, and I think pockets made with two pieces of fabric turned and stitched on look so much cleaner and have more square corners.  Now that I make them like that all the time, the hemming way looks sloppy to me.  The bottom also flares, but that is the cut of the pattern.  The hood looks fine (and is actually the Kwik Sew hood on the McCalls pattern), and the zipper and hood connection point look fine~ probably helped by the fact that I had the right length zipper.  I put it on my son and laughed out loud.  It was SO SO wide, I took it right off and didn't even snap a photo.  It was also too short.  So I gave it to a shorter and wider buddy of his at school.  Oh well.
Pin It

Saturday, November 3, 2012

Family Cargo Bike Research

We are thinking of upgrading our family biking experience from a baby seat in rear with trailer in back (more on our family biking here and here). It has been great to take them both along with me. I mean FABULOUS and great and I love it.

But they both want the baby seat.  Who could blame them?  It is open air, and you can talk to Mommy.

One major benefit I like about the trailer is the oodles and oodles of storage space.  I can fit two kids in it (I don't, though, I only fit one-- I don't want them way back there without supervision doing who-knows-what to each other), plus 2 bags of groceries in its trunk plus whatever they are willing to hold at their feet and on their laps.  I also have the rear rack of my bike for storage (which I use for a child currently).  I also have a little clip-on front bag where I keep my phone, keys, wallet, tissues, a change of pants for the recently potty trained child, and snacks for the rider behind me

But all of this gets a bit heavy and tugs at me.

So... I started researching.

It seems like in places other than the USA, and in some areas of the USA like Portland and the Bay Area (wait- that's where I live- why don't I see this???), there are some pretty cool family cargo bike setups.  I am not going to repeat them all here, since they are pretty easy to find using my BFF Google.  I am just going to tell you about what I am considering as our next step.

Here is what my hours and hours of research on this has come to/ this is what I am thinking about:

The Madsen Bucket Bike

8 speed step-through bike with a bucket in the back with 2 benches and 4 seatbelts. Can hold 600 pounds. Disc brakes, double kickstand.  Optional front and rear racks. $1500.

Pros:

  • available at REI (read: I have a huge dividend there this year and their return policy can't be beat)
  • can load stuff in back without spending a ton of time organizing it
  • Multi-rider height adjustable

Cons:

  • Fairly upright body position
  • Are they too far back there?
  • Can't test ride (NOTE: I got to ride one!!! See here)
  • Will they be too close to each other and me too far away?
  • Will the bike be able to corner ok and take hills ok?


The WorkCycles FR8


8 speed step-through Dutch-style bike with a long rear rack (to hold 2 child seats) and an optional child seat on saddle behind handlebar. Can hold 550 pounds total. Coaster brake, double kickstand, optional rack in front. $2300.

Pros:

  • Looks like a bike
  • Multi-rider height adjustable
  • All on bike together 
  • Sealed chain (pants won't get caught)
  • Integrated lights

Cons:

  • Coaster brake (hand brake available though)
  • May need to adjust smaller child seats to fit my children (are they too small/ need seat belts)
  • Will the child between my legs by ok sharing the handlebar with me?
  • Slightly difficult to wade though all the options
  • The SF dealer just moved to Sausalito


The Xtracycle Longtail Edgerunner (to be released in the spring)


21 speed with smaller (20") rear wheel to lower center of gravity and make it more stable. Longtail bike. Disc brakes. Double kickstand.  $2000 before the kids' seats (+/- $300) and bags (+/- $200).

Pros:

  • Could add on electric assist
  • Multi-rider height adjustable
  • Stable
  • Test rode this (after writing the rest of this post). Amazing. As stable as I thought it would be, plus easy up and down a short hill.  I was also really impressed with the Xtracycle folks (I went to their HQ and rode the prototype).  My kids were quiet and calm, and the older one said it was the best one (he has also been on test rides of the Big Dummy, Xtracycle Radish, and electric Yuba Mundo).  Easy to start from stopped, and to stop quickly.  Also fine to U-turn and I even had the courage to lean a bit into a curve and it felt fine.   I also test rode with the Hooptie and liked the product quite a bit.  
  • Awesome double kickstand
  • Kids can climb on without help 
  • Can lift it
  • Can do a braze-on front storage (that means it's attached to the frame directly) or a clip-off little front basket.

Cons:

  • Could add on electric assist (at what point are you not really riding?)
  • Expensive (but I suppose they all are)
  • We will need a better solution than the kickstand as a foot rest for the front older child (many options, though)
  • The stock pedals didn't really grip my feet (will need pokier ones)


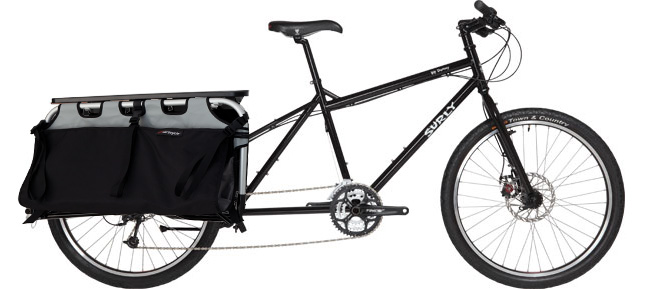
The Xtracycle-approved Surly Big Dummy  


21-speed mountain bike style longtail. Cable brakes. 400 pounds' capacity. $2000 before the kids' seats (+/- $300) and bags (+/- $200).

Pros:

  • Test rode it. Felt like my bike, but with some extra room in back for the boys and a couple of huge panniers (3 grocery bags' worth on both sides= 6 total). 
  • Stable
  • Compatible with all the Xtracycle components
  • Supposedly easy to ride on hills and under a load

Cons:

  • Um..... expensive. Can't think of anything else. 
  • Oh, are those the best brakes around?
  • Could just keep adding stuff (or is that a Pro?)


Pin It

Friday, November 2, 2012

Music Together Make-Up Class

We have been going to our Music Together class, me and the two kids.  It is a ten week session that is paid in advance.  Last week we did a make-up class with the same instructor and same room at a different time.  We actually liked it so much that I think we may switch.

We liked it so much because it was a bit earlier in the day, so we were more fresh and not hungry.

Also, it was a smaller class so there was the same small circle around the drum but not so much competition for a spot there, and the teacher could give my kids a bit more focused attention.  There was also another mom with two kids there, so I didn't feel so out of place with my brood.

It was the same songs and same (highly energetic) teacher, so my kids got what they were expecting.  I think that is one of the biggest benefits of Music Together - the CD to take home and the same songs in class and at home, so the kids (and parents) get to know the music and feel a bit of ownership over it, or at least a high level of familiarity.


Here is what we thought of week one.
Here is what we thought of week two.
Here is what we thought of week three.

+++++++++++++++
Disclaimer: Many thanks to East Bay Music Together for letting us attend for free in exchange for my thoughts in writing.
Pin It

Thursday, November 1, 2012

DIY Child's Cape


As part of his Halloween costume, the bigger guy wanted a cape.  So we made him one with his initial on one side...

...and the littler guy's initial on the other side.

Just in case they wanted to share it.

A better idea probably would have been to make two of them, since they seem to want stuff at exactly the same time (instead of taking turns).

You can see I used a snap to close it, and reinforced the snap area with the same fabric with which I did the applique.  I attached both the reinforcing fabric and letter fabric with a zig zag overstitching the edge.  For the rest of the cape, I attached the pieced, right sides together, leaving a hole for turning, then topstitched it closed.

He likes it! Success!
Posted by Picasa
Pin It

LinkWithin

Related Posts Plugin for WordPress, Blogger...