Thursday, February 28, 2013

"Tell me about your picture"

 
My preschooler came home with a piece of art that represents something.  Here it is.

I had the good fortune of having been coached by my older brother in things to say to your child that will help nurture them.  He recommends saying, "Tell me about your picture," all the time.

It worked beautifully here.  My son told me all about his gourd.  He used two colors, and they sparkled when they were mixed.  The thick part on the left (which I learned was the bottom when I went to hang it on the wall) is the stem, where it grows from the ground.  It also attaches on the top.

I may leave it on the wall for a good long while.
Pin It

Wednesday, February 27, 2013

Make Your Own Liquid Play Doh

 Liquid Play Doh is a preschool creation.  It is made of a third flour, a third water, and a third salt.  You put paint into the water portion to color it.

After it has been made, it goes into a squeeze bottle and the kids squeeze it onto paper (or cardboard, or a paper plate, etc.).


It is fun for them to squeeze and mix colors.

For us, the little guy just wanted to paint.  The older guy liked mixing it, but said my little squeeze water bottles were inferior to the real squeeze bottles at school.


Regardless, we were able to create a joint masterpiece.
Posted by Picasa

Pin It

Tuesday, February 26, 2013

Flannel Baby Blankets


These blankets are really easy to make and are so useful.  They make great gifts.

I made two this time, one double-layer and one single-layer.  The single layer is 20" x 36" and the double layer is 20" x 26".  I think an ideal blanket is about 26" x 36".

To make the single-layer blanket, you cut the fabric, then hem it under.  To make the double-layer blanket, you cut the fabric then sew it together, right sides facing, leaving a 2"-4" hole for turning on one side (tip: make it on an edge, not a corner).  Then turn it right side out and iron the edges flat.  Then topstitch around, closing the turning hole as you go (tip: use a wider straight stitch for topstitching- it looks nicer-- like a 3.5).

Viola!  Soft and useful!
Posted by Picasa
Pin It

Monday, February 25, 2013

Magic Modeling Clay into Tooth Crowns

Unfortunately, I broke a tooth last week and need a crown.


I went to the dentist and they had me go to the tooth factory (the lab where they make crowns) to get custom color matching done.  I brought both kids and asked for a tour.  The boss came out and gladly gave us one.  We saw the people making mouth molds, and the tooling equipment and all of the various stations and kilns.  It was pretty awesome.  He even thanked us for our interest and gave my kids the molds of someone's mouth and a matching crown as a parting gift. 

We got home and my older son has been making more crowns for the mouth mold using Magic Modeling Clay.  
 
Also, every time I say "dentist," my younger son points to his teeth and says, "uh-oh."

Posted by Picasa
Pin It

Sunday, February 24, 2013

Kids' Pin Flower Garden

 
The kids like to take my pins and plant a flower garden every now and again.  In this particular example, they also labeled it with one of my labels.


Pin It

Saturday, February 23, 2013

Roasted Cabbage

 
I was inspired by the recipe on Nourished Kitchen and it was so easy and delicious.  All you do is wedge cabbage, sprinkle olive oil and sea salt, and roast at 350 for 25 minutes.  Easy - and delicious!
Pin It

Friday, February 22, 2013

Kids' Art with Coffee Filters, Markers, and a Stapler

 
These are coffee filters.  The age of the child will determine how much help s/he needs completing this project.  They are decorated with markers, crayons, and stickers, and then the child (or you) can cut filling from more filters or other material.  Then another filter is stapled below.  It takes a bit of dexterity to line up the top and bottom to staple, plus all that cutting and stapling require.  Quite entertaining.
Pin It

Thursday, February 21, 2013

Recipe: Gluten (and Grain) Free Salmon Cakes

Salmon Cakes
serves 4 (makes 6)
inspired by recipe in It Starts with Food


3 cans Vital Choice Salmon, rinsed and de-boned
3 eggs, opened by your mini chef in training
3-5 kale leaves, de-ribbed and chopped small
3-5 ribs celery, diced
pinch sea salt
2 T coconut oil


 Mix ingredients into a bowl.

Heat coconut oil in skillet (we use cast iron).

Spoon mixture into 1/3 cup measuring cup and place onto skillet, flattening slightly.  Flip when golden, about 3 minutes.  Let brown and remove.
  Posted by Picasa
Pin It

Wednesday, February 20, 2013

Pattern Review: Favorite Purse Pattern by Melly Sews


Though adorable (and with a ton of useful pockets), this bag was really frustrating.  It is from Melly Sews and is her "Favorite Purse" pattern.

Positives of the pattern were that the pieces all fit together and it is a nice size.  Actually, now that I think about it, my outer pleated pockets didn't fit just right over the main body piece and I had to cut them down.

Negatives were the way she explained how to do the zipper pockets (it made me think of why people hate zippers!) and their linings.  Her explanation of how to do the binding and side circles was also inferior (see how I skipped both).

I also like how the bag has a main zipper, although how she attached the handle could have been more discreet and it doesn't make sense why she laps the edges of the main body zipper under towards the end.

The straps are fine- the whole package got a bit thick in my machine at the end- but at least her explanation made sense!  The others were a bit brief- even for an "intermediate level seamstress" like she recommends to do this pattern.  I quite like the adjustable strap.


All in all, I'd say give this pattern a skip.  The directions are understandable enough but there are far easier methods for accomplishing many of the tasks (like the Hobo Bag, for example).
Posted by Picasa
Pin It

Tuesday, February 19, 2013

Curing and Flavoring Black Olives at Home DIY


The olives seen here were picked in Davis, CA.  They were split between black and green, and the black were salt-cured and the green brine-cured.  That means that the black were packed in kosher salt upside down with a permeable cover (for about 6 weeks) and the green were left in a brine (1:10 salt and water and changed weekly for about 8 weeks).

When the black olives were done curing, we followed a recipe in The Joy of Pickling, adding in olive oil, crushed bay leaves, orange rind, and garlic, and letting them sit for 6-24 hours.  
 
Here they are.  We rinse them before eating, and they are pretty good.  The orange is quite strong.
Pin It

Monday, February 18, 2013

Easy Baby Lunch Box Ideas (Tree Nut Free)


Here are some school-ready ideas for baby lunch boxes (tree nut free- just like the schools seem to be):
  • Cucumber slices
  • Oatmeal cupcakes
  • Banana (and other fruits like sliced apple, kiwi, oranges, persimmon, etc.)
  • Red pepper (or other color) slices with hummus (or nothing) for dipping
  • Whole carrots with chopped liver
  • Leftover hamburger or steak
  • Canned tuna or salmon
  • Tiny smoothies in a thermos
  • Broth in a thermos
  • Leftover sweet potato (plain or as french fries)
  • Leftover broccoli (steamed with butter and sea salt)
  • Plain yogurt (full-fat and organic)
  • Yogurt with oats, flaxseed meal, chia seeds, and pomegranate mixed in


Pin It

Sunday, February 17, 2013

Preschooler Hand Sewing Project: Rings and Scraps

 
My preschooler (age 4.5) likes hand sewing.  He made this with thread and some rings with fleece scraps.  I thread the needle for him, and do the knot at the end.  He does the rest.  
Pin It

Saturday, February 16, 2013

Kid Pants

 
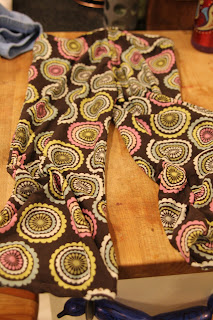
These are thin and comfortable, with an elastic waistband.  My go-to pattern ended a few sizes ago, so I made them using a pair of pants that fit on some fabric that I cut around.  I made sure to leave a seam allowance.  They are a hit.
Pin It

Friday, February 15, 2013

Top Ten Reasons to Cloth Diaper (Cloth Vs. Disposable Diapers)


  1. Cloth diapering is easy.  There are all sorts of styles and cuts and thicknesses.  Once you sort out what you like and your system, it is easy.  One style, the "all-in-one," is just like disposables and you choose snaps or velcro and wash them at home.  You can wash with your regular laundry after rinsing any poop off into the toilet (you don't have to touch it, I swear- just buy a diaper sprayer for $20), or wash on hot with some vinegar instead of fabric softener.
  2. It's not gross.  Really.  It also encourages you to notice when your child is pooping, and place them over the toilet.  You can really see that that is where poop goes, so why not put the child there instead of using the diaper as a middle man.  You can also use a diaper sprayer (a $20 gadget that attaches to the toilet) so you never touch poop.  
  3. They are cute.  There are some really adorable cloth diapers out there.  And they are so soft against Baby's skin.
  4. It's cheaper. You pay once (or once per size), and then add them into the regular laundry.  They have resale value as well (about half your cost new).  Disposable diapers average 20 cents each, and parents go through 8 per day on average.  That's $1,752 if your child potty trains at age three.  Plus you need wipes at 5 cents each- so if you use one wipe per diaper change (unlikely but possible), that adds $438.  That brings the disposable total to $2,190 for diapers and wipes at 8 changes per day for three years using one wipe per change.   Cloth all-in-ones cost about $10 each, and if you use sized diapers (newborn, S, M, L, and also XL is available if needed), then you need about a dozen per size (that is doing laundry about every other day- less as they get older, of course, and use the potty more).  You could have far fewer, but a dozen is a comfortable number.  At a dozen all-in-ones per size that is $120 per size, then you get half back when you sell them on craigslist.  So they end up costing about $60 per size if you start with new diapers (if you buy them used, you get the full value back when you resell them- who can beat free diapers?!).  If your child potty trains at two years (a generous number for cloth diapering users), they would only go up to size large.  So four sizes at $60 per size is $240 for the whole thing.  That, plus an optional but nice to have diaper sprayer ($20), a wet bag for when you go out ($20 but also can be re-sold and you can use plastic baggies as well), and either disposable wipes or cloth wipes (cut up old t-shirts work great) with water and soap.  Personally, I prefer these to disposable wipes-- fewer chemicals and fewer shopping trips.  If you buy cloth wipes they are up to $1 each, and I would buy two dozen.  All in all, if you have one kid who potty trains at two and you buy new cloth all-in-ones (a dozen per size NB, S, M, and L at $10 each) and use cut-up t-shirts as wipes with soap and water, then sell the diapers when you are done, the whole experience will cost $280. Plus your kid will be in underwear about a year before the average.  You could go wild and crazy and buy 18 per size, and it will bring your cost up to $400.  Add on two dozen cloth wipes and your total is $424.  That's a far cry from $2,190. 
  5. Two for the price of one.  You can use cloth diapers for a second child (or more), for free, before re-selling them, as they last for about four kids, depending on how many diapers are in each kid's rotation.  You can easily buy gender-neutral colors the first go around.
  6. Fewer shopping trips.  You never run out of cloth diapers at midnight.
  7. Kids in cloth diapers potty train faster.  Both our kids were daytime potty trained by a year (and we have carried extra pants around for an additional year for pee misses).  Babies feel when they are wet, so they have reason to tell you when they have to go.  Disposables have gotten so advanced these days that kids don't even realize they have peed. The feedback loop from using cloth diapers and feeling the wetness against their skin helps them potty train.
  8. Less diaper rash.  Really.  With clean, dry cloth diapers against Baby's skin, Baby is less apt to get a rash.  Parents will often let Baby sit in a feel-dry disposable with the chemicals and urine right next to Baby's skin for longer than if Baby were wearing cloth.  
  9. Zero landfill use.  The experts debate if it is more environmental to use disposable vs. cloth diapers.  There is talk that disposables use more resources and chemicals to make than cloth diapers do, and that they end up in the landfill (and often with solid human waste wrapped inside-- potentially leaching into groundwater).  But there is also talk that cloth diapers use electricity and water to wash (plus gas and air pollution if you use a commercial diaper service to pick up your diapers).  As far as resources go, it is my understanding that water and electricity are renewable resources, and I would rather use them than putting more chemicals into our environment and filling the landfills.
  10. No weird chemicals against baby's soft skin (especially against their reproductive organs).  

Posted by Picasa
Pin It

Thursday, February 14, 2013

Cleaning the Chicken Food Bin


We keep the chicken food in two bins by the coop.  One is plastic and the other is metal.  Both have gotten a little in need of a cleaning, and I had two eager helpers, especially since we have a rule that we don't play with the hose in the winter. Notice little brother watching big brother's every move.  Brrr....


Posted by Picasa
Pin It

Wednesday, February 13, 2013

My Cabbage Patch Kid gets New Life

I just did a post about how the kids have been playing with my old Cabbage Patch Kid from the '80s (here).

These first few photos are from when my now 4.5 year old was about 1.5 years old (his brother's age now). You can see him taking the doll's clothing off and then pottying the doll.
 

My Cabbage Patch Kid has more recently gotten action as the recipient of a homemade sleep sack, and in a row of sleeping babies with the other dollies.  In that row, my preschooler made them all matching blankets and tiny loveys, then carried them all around for a few days in a box ("crib").

Posted by Picasa
Pin It

Tuesday, February 12, 2013

Baby in Doll Ergo and Sleep Sack from a Toddler


This is the Child Ergo I made (here).  Little brother likes the doll collection these days, and wanted to wear one of the babies on his back.

This was all of the dollies with preschooler-made blankets and loveys.


In other news, we made another sleep sack for another of the babies (original post here).  This was Big Brother's idea, and he actually did a great deal of the stitching and labor.  To make this one, we laid her onto a piece of fleece and cut around her.  We made sure to cut up around the arms and make a neckline.  Then my little helper hand stitched the edges up each side.  I did one shoulder, and we closed the other with a safety pin.  Now she's ready for bed!
 
And yes, thanks for asking, that doll is my original Cabbage Patch Kid from the '80s.
Pin It

Monday, February 11, 2013

Lululemon Shorts into Kid (Yoga) Pants

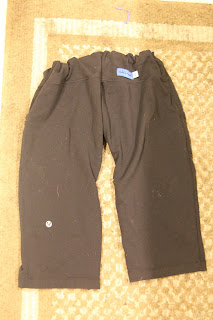
I had a pair of baggy Lululemon shorts I wore while pregnant that no longer fit but were still in good condition.  So, instead of giving them away... my older child (a little bigger than size 5T) now has another pair of pants in this awesome fabric.


To make them, I laid a pair of pants that fit him on top of these.  Turns out that the length was just perfect to keep the waistband and bottom hem intact.  I was also able to keep the pockets.

I cut the inner seam, then stitched it up.

To make the waistband, I took the existing drawstring and cut it to size and re-threaded it.

They are a bit baggy- I think I need to tighten up the waist and legs to make them a more loved and lovable pair of pants.


Posted by Picasa
Pin It

Sunday, February 10, 2013

Best Hat Ever


Child #1 Loved this hat because of the little velcro pocket which we put almonds into.  He named it the "almond hattie."  I bought it at a consignment shop in size 2-3T when he was 6 months old and it was big, but kept the sun off.  It still slightly fits, and he loves it (though it no longer keeps the sun off- he is 4.5 years old now).


Child #2 keeps putting this hat on (he is 1.5 years old).  It is winter, but he likes that he can put it on and off, and he likes saying "hat" and grabbing it.
Pin It

LinkWithin

Related Posts Plugin for WordPress, Blogger...